PhotoRobot Merkezsiz Tablo CL1300 & CL850 Kullanıcı Kılavuzu
Aşağıdaki PhotoRobot Merkezsiz Tablo CL1300 ve CL850 Kullanıcı Rehberi, yakın zamanda bir cihaz satın almış müşterileri desteklemeyi amaçlamaktadır. CL1300 ve CL850 pikapları için, her cihazın ana bileşenleri hakkında ayrıntılı bilgiler ve ilk kullanım ile kurulum talimatları içeren bir cihaz genel görünümü bulunmaktadır. Bu bilgiler, PhotoRobot'un ilk anlaşılması, temel testleri ve işletilmesini kolaylaştırmaya yardımcı olur.
Önemli: Bir PhotoRobot sisteminin ilk kurulumu her zaman yetkili bir PhotoRobot otoritesi tarafından yapılmalıdır. PhotoRobot kurulum yetkisine sahip yetkililer, onaylı bir dağıtıcı veya üreticinin temsilcisidir.
Not: İlk kullanımdan önce her zaman cihazınızla birlikte özel olarak verilen kılavuza ek olarak PhotoRobot Güvenlik Bilgileri ve Talimatları'na da bakın.
Merkezsiz Tabla CL1300 ve CL850 Pikap Modülleri
PhotoRobot Merkezsiz Masa'yı satın aldığınız için tebrikler ve teşekkürler! PhotoRobot, otomatik fotoğrafçılıkta onlarca yıllık birinci elden deneyim ve yeniliği temsil ediyor. Sadece bu değil, her sistem işletmenizin benzersiz ihtiyaçlarına göre özelleştirilebilir ve aynı zamanda PhotoRobot müşterileri için hazır çözümlerden oluşan tam bir ekosistem sunar. Bu da PhotoRobot'u açtığınızda, her seansta kolayca, hızlı ve tutarlı şekilde etkileyici sonuçlar elde edeceğinizden emin olabileceğiniz anlamına gelir. PhotoRobot'a hoş geldiniz.
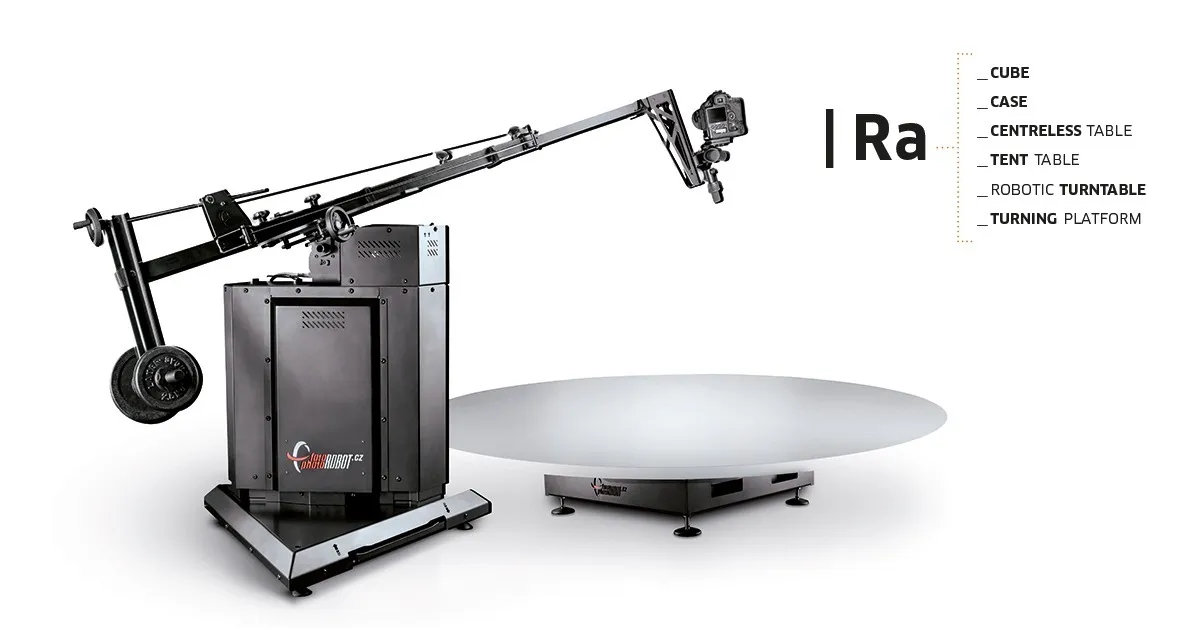
1. Robot Tanımı - Merkezsiz Tablo CL1300, CL850
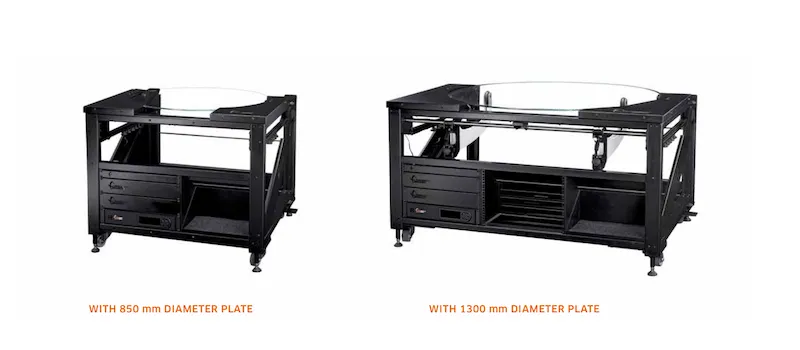
PhotoRobot Merkezsiz Masa, iki modelde mevcuttur: daha büyük CL1300 ve daha küçük CL850. Buna karşılık, CL1300 iki farklı boyutta değiştirilebilir plakaları barındırmak için daha büyük bir çerçeveye sahiptir: 1300 mm çapta ve 850 mm çapta. Bu, farklı boyutlarda ürünleri desteklemek için her iki boyuttaki plakanın kullanılmasına olanak tanır.
Bu arada, CL850 daha kompakt ve sadece tek boyut plakayı destekleyen daha küçük bir çerçeveye sahip: 850 mm çapı. Bunun dışında, CL1300 ve CL850 büyük ölçüde aynı teknoloji bileşenlerini ve özelliklerini paylaşır.
PhotoRobot Merkezsiz Masa'nın temel teknolojik bileşenleri ve özellikleri şunlardır:
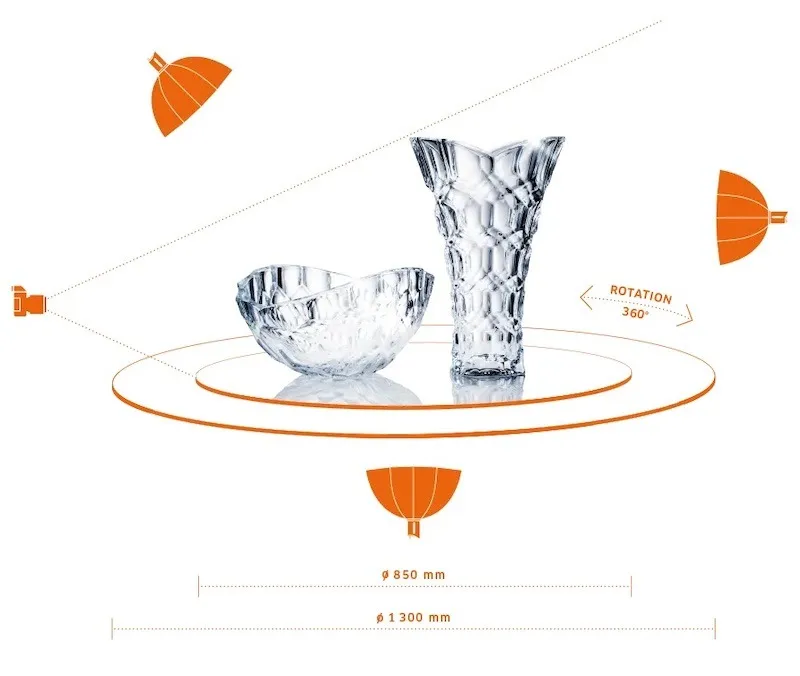
- Gölgesiz görüntü yakalama için optik döner cam plaka.
- Konumlandırma sisteminin bir düğmeye dokunarak kalibrasyonu.
- Lazer yönlendirmesiyle konumlandırma ile nesnelerin dönme merkezine yerleştirilmesi.
- Kısmen veya tamamen büyütülmüş nesnelerin fotoğraflanması için yakın plan işlevi.
- Düzenli yapı, ışıklar tutucular üzerinde ve yerde kablo yok.
- Stüdyo içinde zahmetsiz taşıma için araba tekerlekleri.
- Hassas bir çalışma düzlemi kurmak için büyük ayarlanabilir bacaklar.
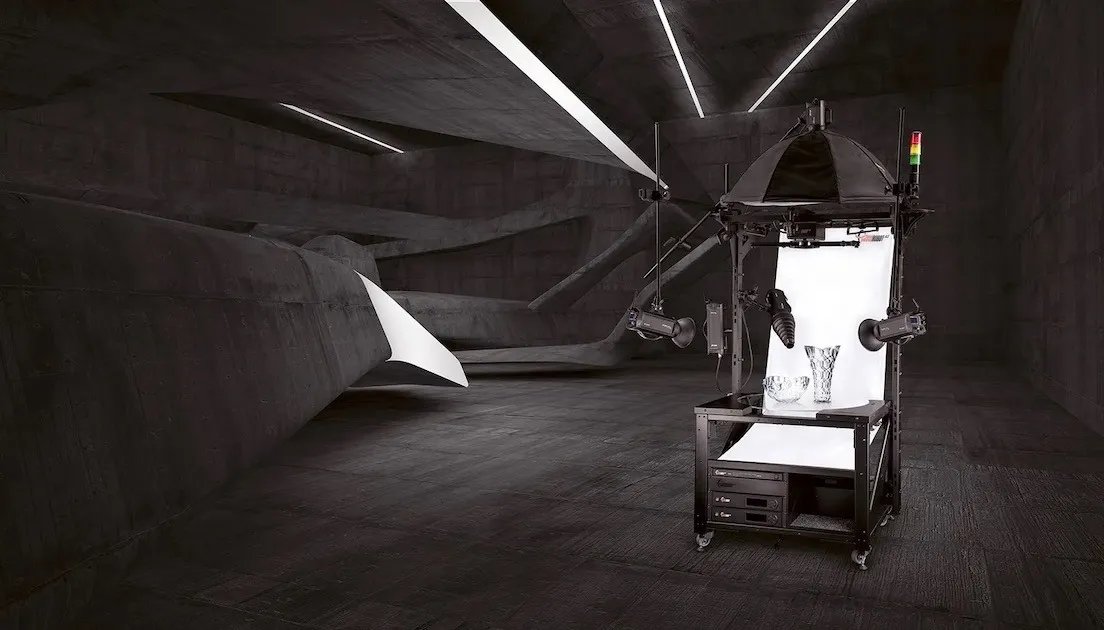
1.1. Studio Entegrasyonu - Merkezsiz Tablo CL1300, CL850
Merkezsiz Masa, küçük ve orta boy ürünlerin gölgesiz ürün fotoğrafçılığı için evrensel bir fotoğrafçılık pikap çözümüdür. Amacı, şeffaf, parlak, açık ve koyu ürünler gibi fotoğrafik özelliklere sahip nesnelerin fotoğrafçılığını hızlandırmak, sadeleştirmek ve basitleştirmek. Döner cam plaka, küpe büyüklüğündeki nesneleri bagaja kadar sahneleyebilirken, dağınık arka plan ise fotoğraf çekimde nesneleri her taraftan aydınlatmayı sağlar. Bu doğal olarak saf beyaz bir zeminde yüksek kaliteli fotoğraflar yaratır. Ayrıca görüntülerin daha hızlı, otomatik post-processing ve yayınlanmasını destekler.
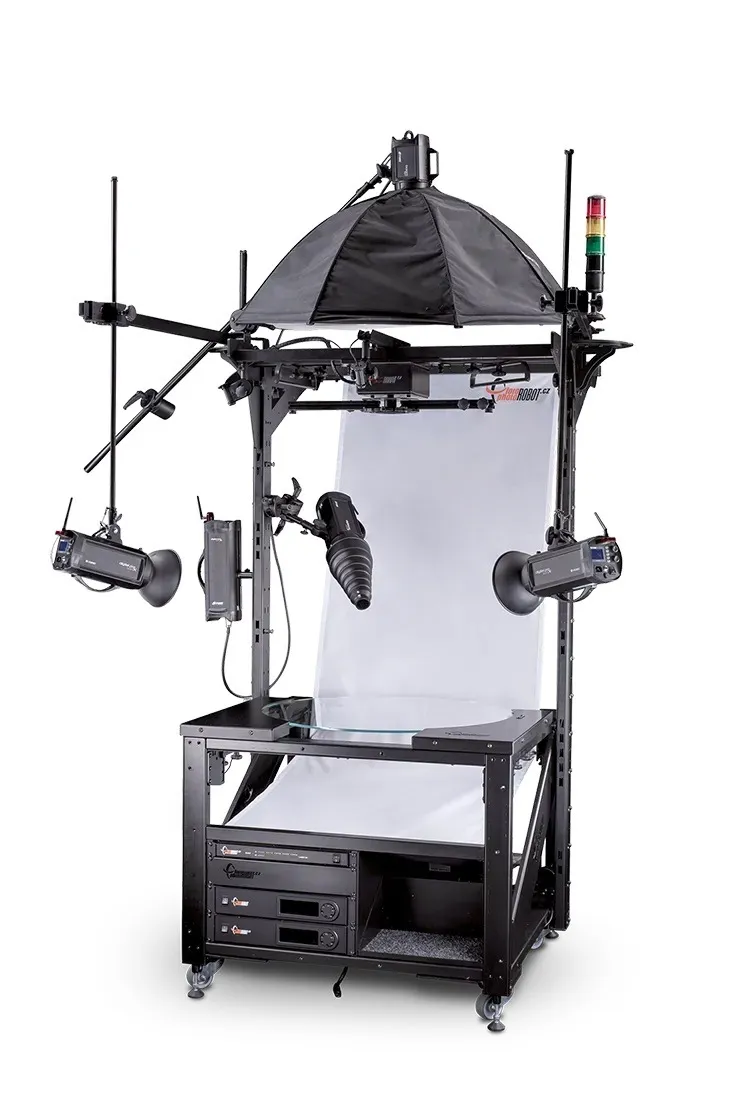
1.2. Merkezsiz Tablonun Ana Bileşenleri
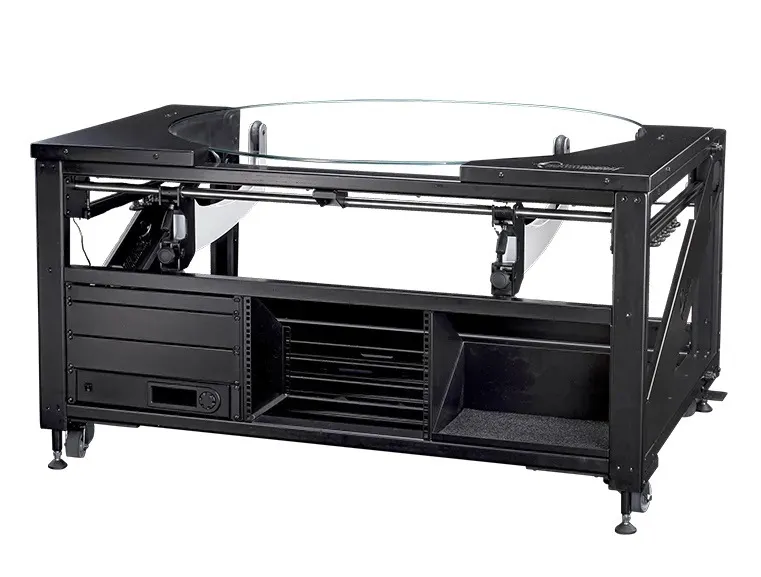
1.2.1. CL1300 ile CL850 arasındaki tek fark, makine gövdesinin çerçeve genişliğidir. Daha geniş varyantın piyasadaki en büyük fotoğrafçılık pikap iş istasyonlarından birini temsil ettiğini unutmayın. Bu, daha büyük modelin 1300 mm çapındaki döner tabla alanı ve 40 kg'ya kadar taşıma kapasitesi sayesinde gerçekleşiyor.
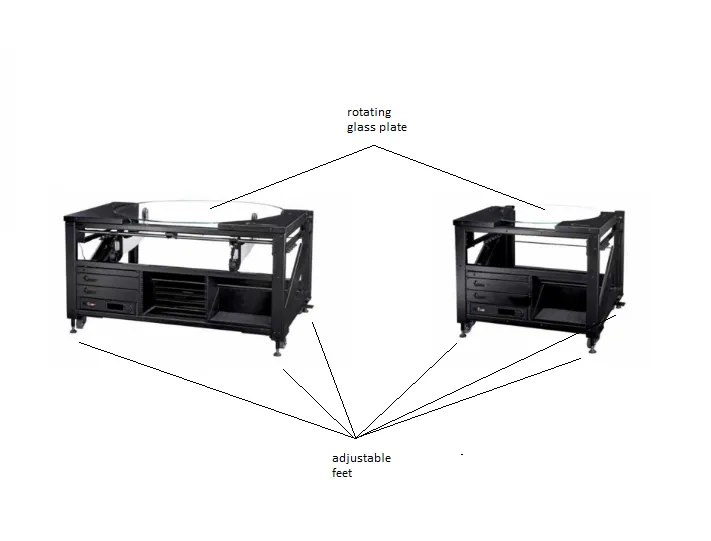
1.2.2. Merkezsiz Masa'nın her iki versiyonunda da cihaz çerçevesinin üst ortasına oturan döner bir cam plaka bulunur. Makinenin alt kısmında, hassas bir çalışma düzlemi kurmak için ayarlanabilir ayaklar bulunur.
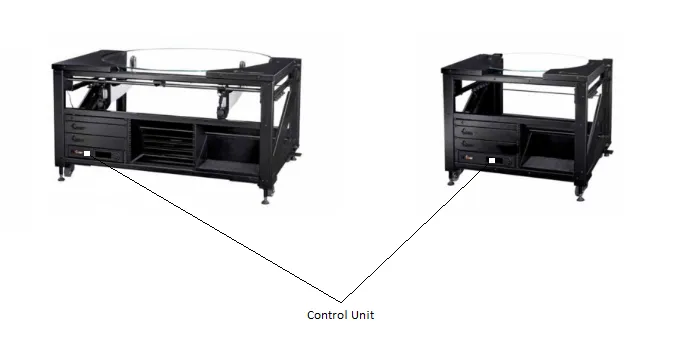
1.2.3. Merkezsiz Masanın Kontrol Ünitesi, makine çerçevesinin ön sol altındaki özel PhotoRobot HD rafının içine fiziksel olarak monte edilmiştir. Kontrol Ünitesi'nin cihazın ayrılmaz bir parçası olduğunu unutmayın. Cihazın tüm hareketlerini ve spin fotoğrafçılığı için kullanılan Robotic Arm, MultiCam ve Cube robotları gibi uyumlu PhotoRobot robotlarını çalıştırır ve kontrol eder.
1.3. Opsiyonel Robotik Kol V8 Genişletmesi
PhotoRobot Robotic Arm V8 genişlemesi, Centerless Table CL1300 ve CL850 modelleriyle uyumludur. Bu, Arm V8'in çoğu PhotoRobot döner pikap ve otomatik 360 fotoğrafçılık cihazlarıyla uyumluluğuna ek olarak sunulmaktadır. Bu, Cube, Turning Platform, C-Class pikaplar ve diğer PhotoRobot sistemleriyle uyumluluk içeriyor.
Robotik Kol V8 genişlemeli CL1300 veya CL850 kullanıyorsanız, montaj, kullanım ve cihazın ilk kullanımıyla ilgili teknik talimatlar için Robotik Kol V8 Kullanım Kılavuzu'na bakınız.
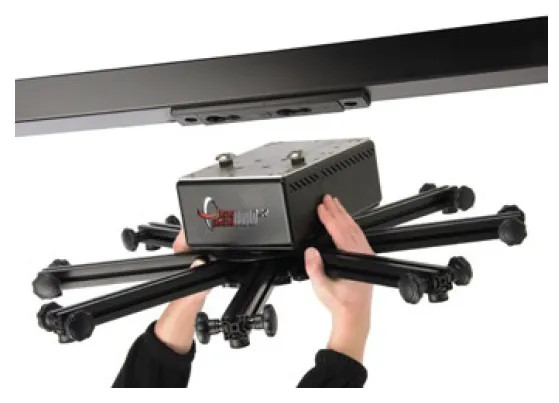
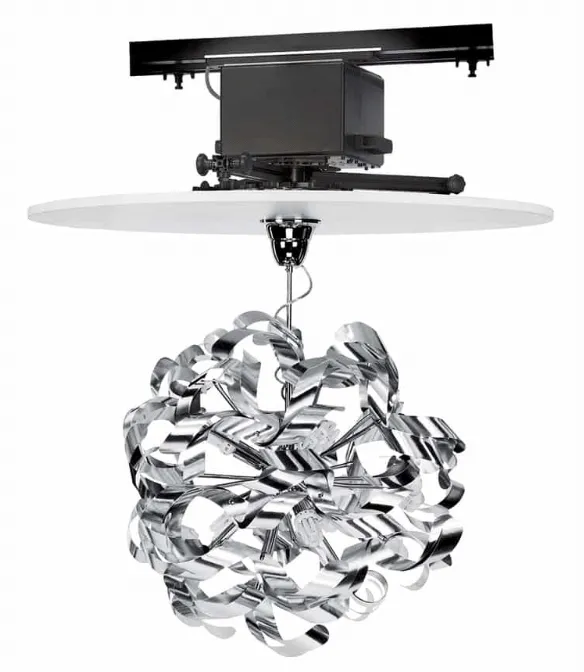
1.4. İsteğe Bağlı Küp Robot Genişletme
Eğer isteğe bağlı PhotoRobot Cube genişlemesini Centerless Table ile kullanıyorsanız, önce cihazın genel bir görünümü olan PhotoRobot Cube Kullanıcı Rehberi'ne bakınız; montaj ve ilk kullanım talimatları da dahil olun.
Not: Merkezsiz Masa ile birlikte, PhotoRobot Cube, döner tabla üzerinde süspansiyon modunda üst portala monte edilir. Bu, el çantaları, avizeler, aydınlatma armatürleri ve 130 kg'a kadar ağırlığındaki nesneler gibi ürünlerin havada asılı kalmasına olanak tanır. Cihaz, ürünün dönüşünü, pikapın hareketini, ışıkları, kamera yakalamasını ve PhotoRobot Robotic Arm gibi diğer robotları senkronize eder.
2. Merkezsiz Masanın İlk Kullanımından Önce
PhotoRobot Merkezsiz Tablo'nun ilk kullanımından önce, PhotoRobot'un donanım ve yazılım bileşenlerinden oluşan modüler bir birim olduğunu anlamak gerekir. Teknik açıdan bakıldığında, bu PhotoRobot'un onu çalıştıran bir bilgisayarla aynı ağ üzerinden bağlanmasını gerektirir. Ayrıca, bulutta erişilebilir PhotoRobot hizmetlerini çalıştırabilmesi için ağın internet bağlantısına sahip olması gerekir.
Önemli: Teknik işletim gereksinimlerini doğrulamak ve PhotoRobot'un bir ağa bağlanmasıyla ilgili ayrıntılı talimatlar için her zaman PhotoRobot İlk Kullanım & Temel Testler bölümüne bakabilirsiniz.
Genel olarak, aşağıdaki temel işletim gereksinimleri mevcuttur.
- Kontrol Ünitesi yerel ağa bağlanmalıdır.
- Servis GUI'sini veya operatörün _Controls adlı yazılımını çalıştırmak için bir bilgisayar gereklidir.
- Bilgisayar, Kontrol Ünitesi ile aynı ağ üzerinden bağlanmalıdır.
- Ağda işlevsel bir internet bağlantısı olmalıdır.

Ayrıca, PhotoRobot ağa bağlandıktan sonra elektrik dağıtım sistemi parametrelerinin (örneğin voltaj ve frekans) kontrol edilmesi gerekir. Bunu yapmak için, Kontrol Ünitesinin arkasındaki RJ45 konnektörünü kullanın. Kontrol Ünitesi kurulumu uygun değilse, manuel voltaj seçicisini Kontrol Ünitesinin arkasında konumlandırarak ayarlayın. Sonra, Kontrol Ünitesi'ni RJ45 konnektörü kullanarak ethernet kablosuyla ağa bağlayın.

Daha sonra, Merkezsiz Tablo'nun işletilmesi için aşağıdaki ağ yapılandırma gereksinimlerinin karşılanması gereklidir.
- Ağda bir DHCP sunucusu zorunludur.
- TCP bağlantı noktaları 7777, 7778 iletişimine izin verilmelidir.
- 6666 numaralı bağlantı noktasında UDP yayınlarına izin verilmelidir.
- İnternet bağlantısı zorunludur.
- *. photorobot.com erişimine izin verilmelidir.
- as-unirobot.azurewebsites.net erişimine izin verilmelidir.
- PhotoRobot LAN'a kablolu bağlantı önerilir.
- Doğru kurulumu doğrulamak ve gerektiğinde sorun giderme için PhotoRobot Ağ Ön Koşulları ve Yapılandırma bölümlerine bakabilirsiniz.
- Elektrik fişini elektrik prizine bağlayın.
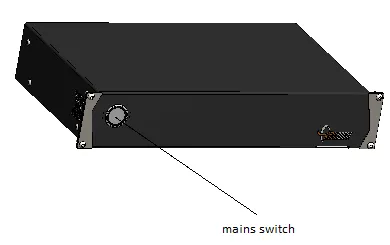
Sonunda, Kontrol Ünitesindeki ana düğmeye basın. Durum değiştiğinde, ışık yanıp sönen ışıktan sabit bir ışığa geçer ve bu da Kontrol Ünitesinin çalışmaya hazır olduğunu gösterir.
2.1. PhotoRobot'un IP adresini LAN üzerinden bulun
CENTERLESS TABLE veya herhangi bir PhotoRobot cihazının IP adresini bulmak için, PhotoRobot Locator uygulaması doğrudan CAPP içine entegre edilmiştir. Bu, harici uygulamalar kullanmadan ağdaki Kontrol Ünitelerinin daha kolay aranmasını ve tanımlanmasını sağlar. Bu özelliğe erişmek için CAPP'nin en güncel sürümünü kullandığınızdan emin olun.
Ardından, CAPP içinde ağdaki bir robotu doğrudan tanımlamak için CAPP'nin yerel sürümünü açın, Ayarlar'a gidin ve Robotlar / Kontrol üniteleri'ne tıklayın.
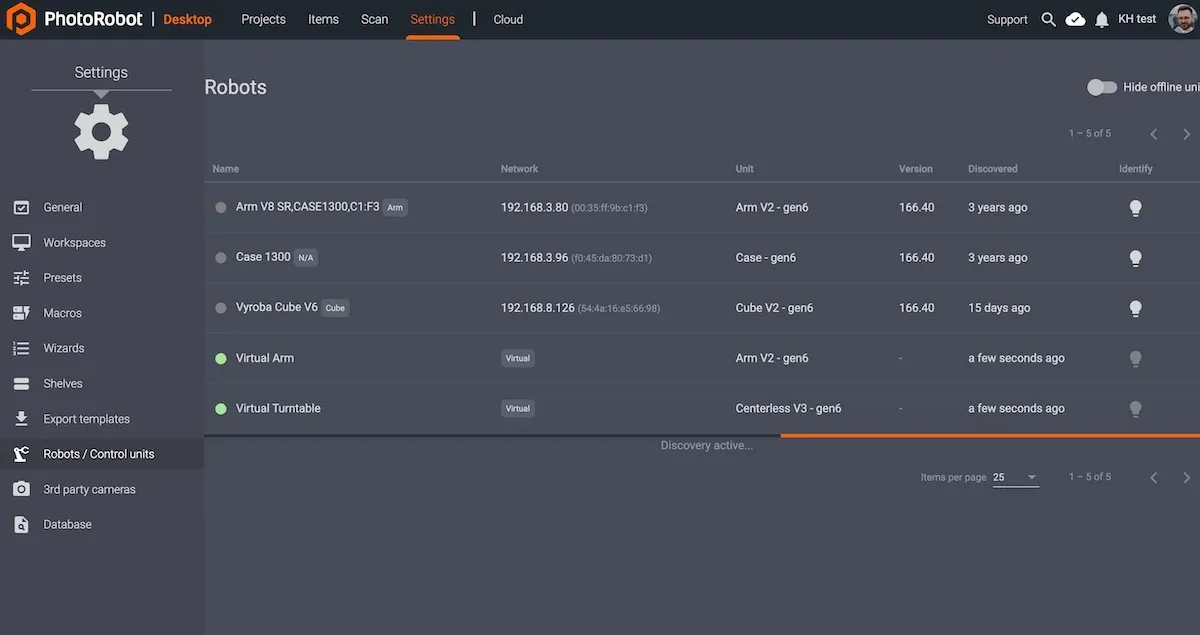
Robotlar / Kontrol üniteleri menüsü, her robot için Ad, Ağ, Ünite, Sürüm, Keşfedildi ve Tanımla sütunlarını görüntüler. Robot adının solundaki nokta yeşilse, robot çevrimiçidir. Robot alanına tıklamak, robotun web sitesi arayüzünü açacaktır. Bu aynı zamanda robotun Kontrol Ünitesi üzerindeki LED ışığının daha kolay tanımlanması için yeşil renkte yanıp sönmesini sağlayacaktır.
Uygulamanın harici olarak indirilmesi müşteri tarafından istenirse, PhotoRobot Locator, PhotoRobot Hesap İndirmeleri içinde iOS indirmesi için de mevcuttur.
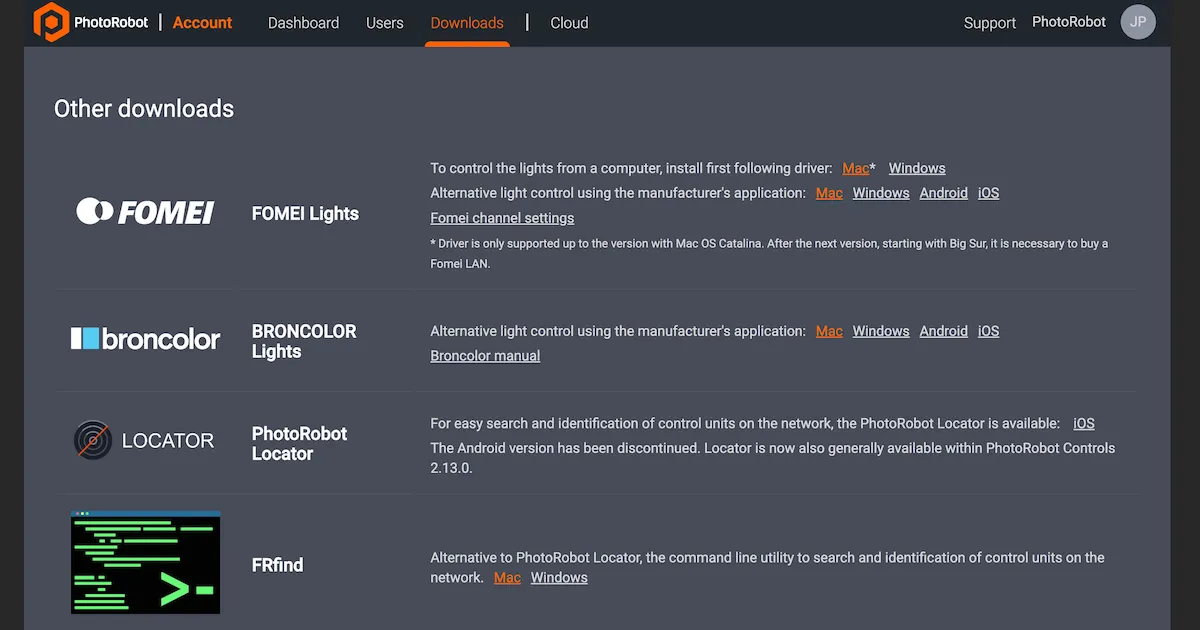
Not: PhotoRobot Locator'ın Android sürümü kullanımdan kaldırılmıştır.
Alternatif olarak, ağı aramak ve PhotoRobot Kontrol Ünitelerini tanımlamak için MacOS veya Windows için FRFind komut satırı yardımcı programı bulunmaktadır. FRFind'i indirme bağlantılarını PhotoRobot Hesap İndirmeleri sayfasında da bulabilirsiniz.
Ardından, bir PhotoRobot cihazı bulduktan sonra, IP adresini kopyalayın ve PhotoRobot'un IP adresini herhangi bir web tarayıcısına URL formatında yapıştırın. Başarılı olursa, PhotoRobot'u test etmek için temel bir kullanıcı arayüzü görüntüleyecek olan Servis GUI'si başlatılacaktır.
2.2. Merkezsiz Tablo için Temel Testleri Çalıştırın
Servis arayüzü açtıktan sonra, basit kullanıcı arayüzü kontrollerini kullanarak önce motoru çalıştırın, ardından platformu istediğiniz açıya çevirin.
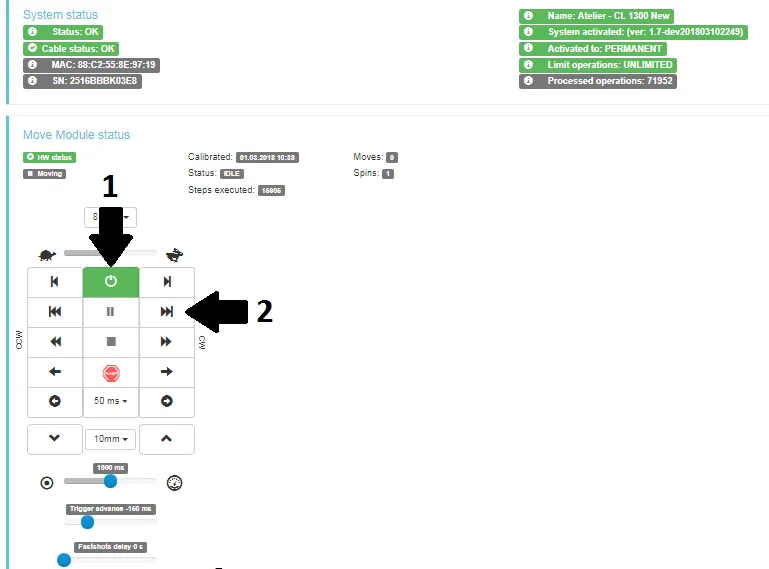
- Motorları çalıştırın (ok 1), döndürmeye çalışın (ok 2).
- Cam plaka dönerse, PhotoRobot Merkezsiz Masa cihazınız düzenli kullanıma hazır olur.
3. PhotoRobot _Controls Yazılım
Yazılım PhotoRobot Controls App ("CAPP"), Centerless Table CL1300 ve CL850 ile diğer PhotoRobot cihazlarının tam kontrolünü sağlar. CAPP, robotlar, kameralar, stüdyo ışıkları ve post prodüksiyon üzerinde kontrolü entegre eder. Bu, iş akışı yönetimi özellikleri ile son işlem sırasında etkili otomasyon için gerekli işlevselliği içerir.
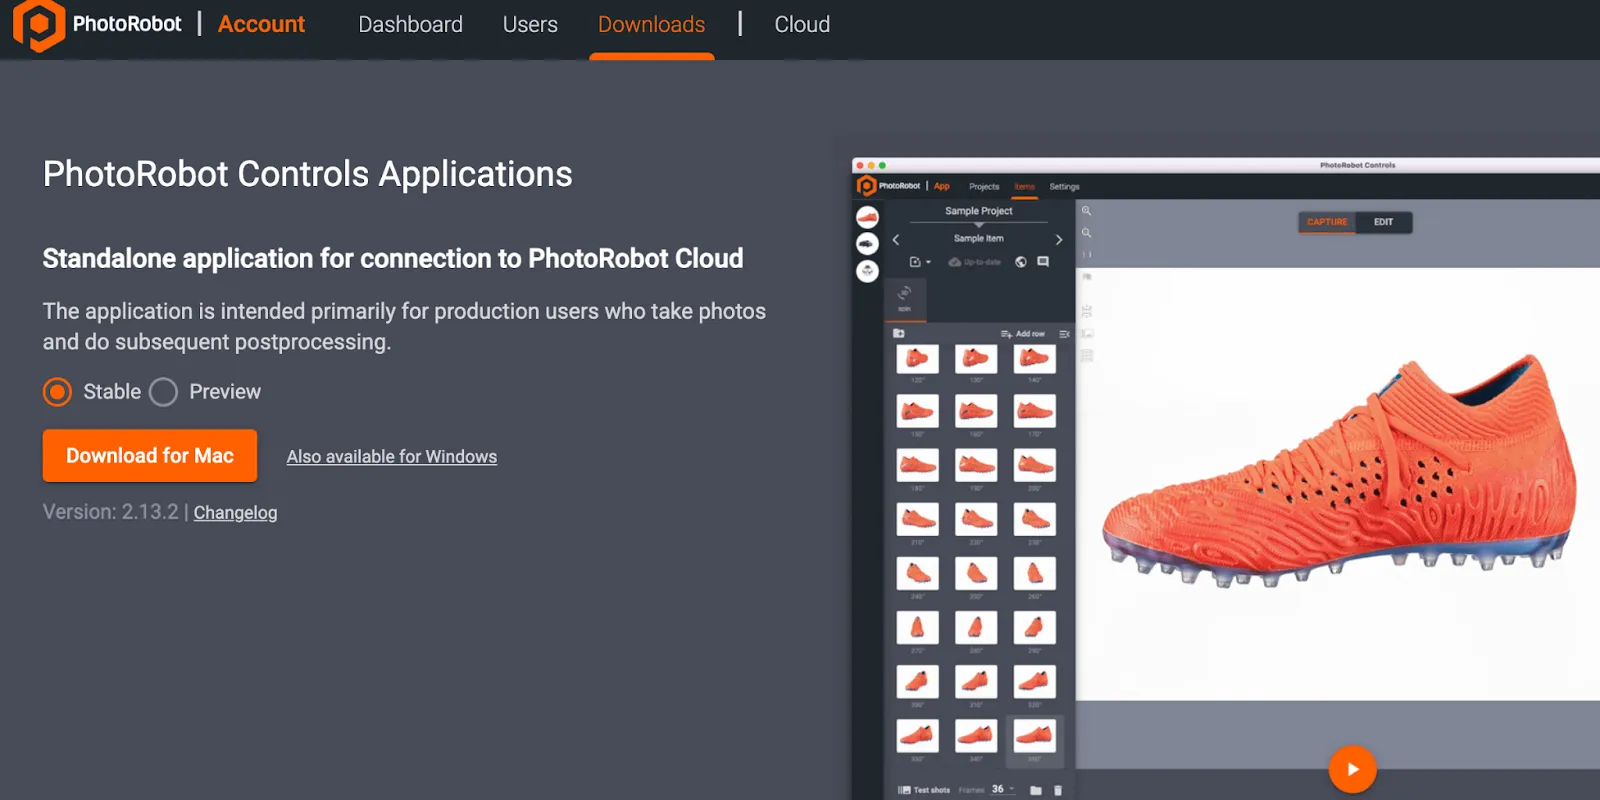
Önemli: PhotoRobot Controls Uygulaması yazılımının makine teslimatının bir parçası olmadığını unutmayın; cihazdan ayrı bir satın alma yöntemidir. PhotoRobot Controls Uygulamasının indirilmesine PhotoRobot Hesabınız üzerinden erişim sağlanabilir.
Not: Kurulumdan sonra başlatıldığında, arayüzün otomatik olarak "sihirbaz modu" olarak başlayabileceğini unutmayın. Wizard modu, yalnızca barkodların taranmasına izin veren basitleştirilmiş bir kullanıcı arayüzüdür ve nesneleri tanımlamak ve yakalama ile sonradan işleme dizilerini otomatik başlatmak için kullanılır.
PhotoRobot Controls Uygulama Yazılımı'nın kurulumu ve kullanımı hakkında ayrıntılı talimatlar ve destek için PhotoRobot Başlanma Kullanım Kılavuzu'na bakınız.
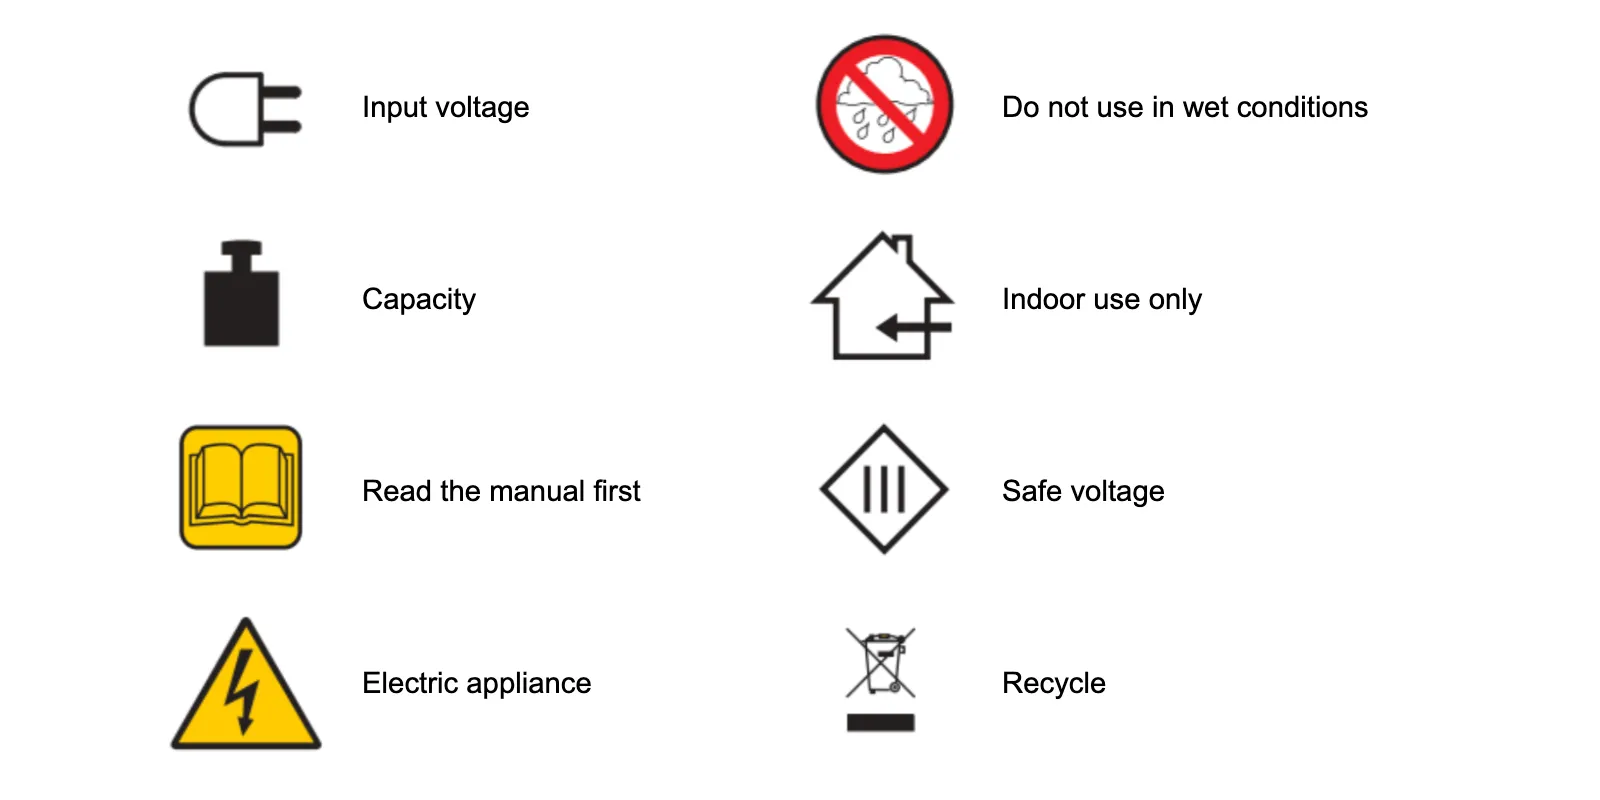
4. Bilgi Etiketleri
4.1. Semboller Genel Bakış
4.2. Makine ve Bileşen Etiketleri
Belirli makineler ve bileşenler için bilgi etiketleri için, PhotoRobot Safety Information and Instructions (3.1.) bölümünden Information Labels (3.1.) bölümüne bakınız.


EOS Asi Serisi


EOS DSLR Serisi


EOS M Aynasız Fotoğraf Makinesi Serisi


PowerShot Serisi


Yakın çekim / Elde Taşınabilir

Canon EOS Rebel Serisi, sağlam görüntü kalitesine, sezgisel kontrollere ve çok yönlü özelliklere sahip yeni başlayanlar için uygun DSLR fotoğraf makineleri sunar. Fotoğraf meraklıları için ideal olan bu kameralar, güvenilir otomatik odaklama, değişken açılı dokunmatik ekranlar ve Full HD veya 4K video kaydı sağlar.
Bağlantı
Çözünürlük (MP)
Çözünürlük
Canon EOS DSLR Serisi, yüksek kaliteli görüntüler, hızlı otomatik odaklama ve çok yönlülük sunarak hem fotoğraf hem de video prodüksiyonu için idealdir.
Bağlantı
Çözünürlük (MP)
Çözünürlük
Canon EOS M Aynasız Yazıcı, kompakt tasarımı DSLR benzeri performansla bir araya getiriyor. Değiştirilebilir lensler, hızlı otomatik odaklama ve yüksek kaliteli görüntü sensörlerine sahip bu kameralar, görüntü kalitesinden ödün vermeden taşınabilirlik arayan gezginler ve içerik oluşturucular için harikadır.
Bağlantı
Çözünürlük (MP)
Çözünürlük
Canon PowerShot Serisi, sıradan çekim tutkunları ve fotoğraf tutkunları için kompakt, kullanıcı dostu fotoğraf makineleri sunar. Basit bas-çek kameralardan gelişmiş zoom kameralara kadar değişen modellerle kolaylık, sağlam görüntü kalitesi ve görüntü sabitleme ve 4K video gibi özellikler sunarlar.
Bağlantı
Çözünürlük (MP)
Çözünürlük
Canon Yakın Çekim ve El Kameraları ayrıntılı, yakın çekim fotoğraf ve video için tasarlanmıştır. Kompakt ve kullanımı kolay olan bu kameralar, hassas odaklama, yüksek çözünürlüklü görüntüleme ve çok yönlü makro özellikleri sunarak vlog çekimi, ürün fotoğrafçılığı ve yaratıcı yakın çekimler için mükemmeldir.
Bağlantı
Çözünürlük (MP)
Çözünürlük


