PhotoRobot Robotik Pikap ve Robotik Kol V8 Kullanıcı Kılavuzu
Aşağıdaki dokümantasyon, Robotic Arm V8 genişlemeli PhotoRobot Robotik Pikap için kullanım kılavuzu olarak hizmet vermektedir. Bu kılavuz, yalnızca yakın zamanda bir cihaz satın alan PhotoRobot müşterileri için tasarlanmıştır. Amacı, robotik iş istasyonunun ilk anlaşılması, temel testleri ve ilk işletilmesini kolaylaştırmayı amaçlamaktadır. Robotik Kol genişletme ile Robotik Pikap'ın ayrıntılı bir tanımını, iş istasyonunun genel bir özetini ve ilk kez PhotoRobot kullanımı ve kurulumu için talimatları bulun.
Önemli: Bir PhotoRobot cihazının ilk kurulumu her zaman yetkili bir PhotoRobot otoritesi tarafından yapılmalıdır. PhotoRobot kurulum yetkisine sahip yetkililer, onaylı bir dağıtıcı veya üreticinin temsilcisidir.
Not: İlk kullanımdan önce her zaman cihazınızla birlikte özel olarak verilen kılavuza ek olarak PhotoRobot Güvenlik Bilgileri ve Talimatları'na da bakın.
Robotik Kol V8 Genişlemeli Robotik Pipod
PhotoRobot cihazınızı satın aldığınız için tebrikler ve teşekkürler! PhotoRobot, otomatik fotoğrafçılıkta onlarca yıllık birinci elden deneyim ve yeniliği temsil ediyor. Benzersiz ihtiyaçlara uyarlanabilir teknoloji sunarken, aynı zamanda PhotoRobot müşterilerini destekleyen büyüyen hazır çözümler ekosistemini sunuyor. Şık ve yaratıcı olan PhotoRobot, stüdyoyu her açtığınızda daha kolay, daha hızlı ve tutarlı prodüksiyon vaat ediyor. PhotoRobot'a hoş geldiniz.
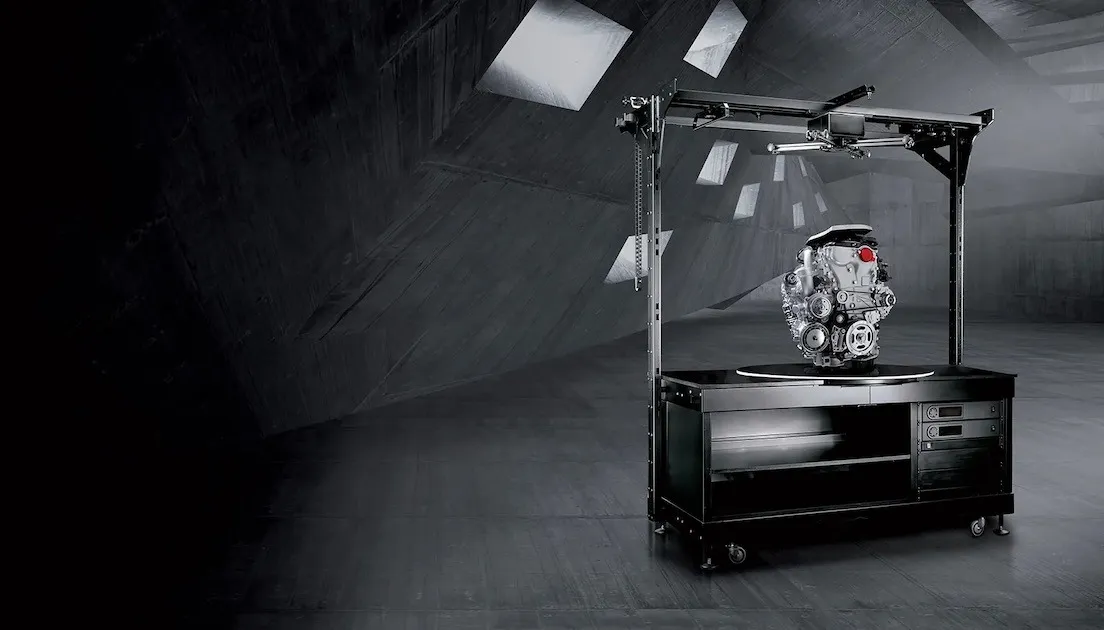
1. İş İstasyonu Tanımı - Robotik Turntable ve Kol V8
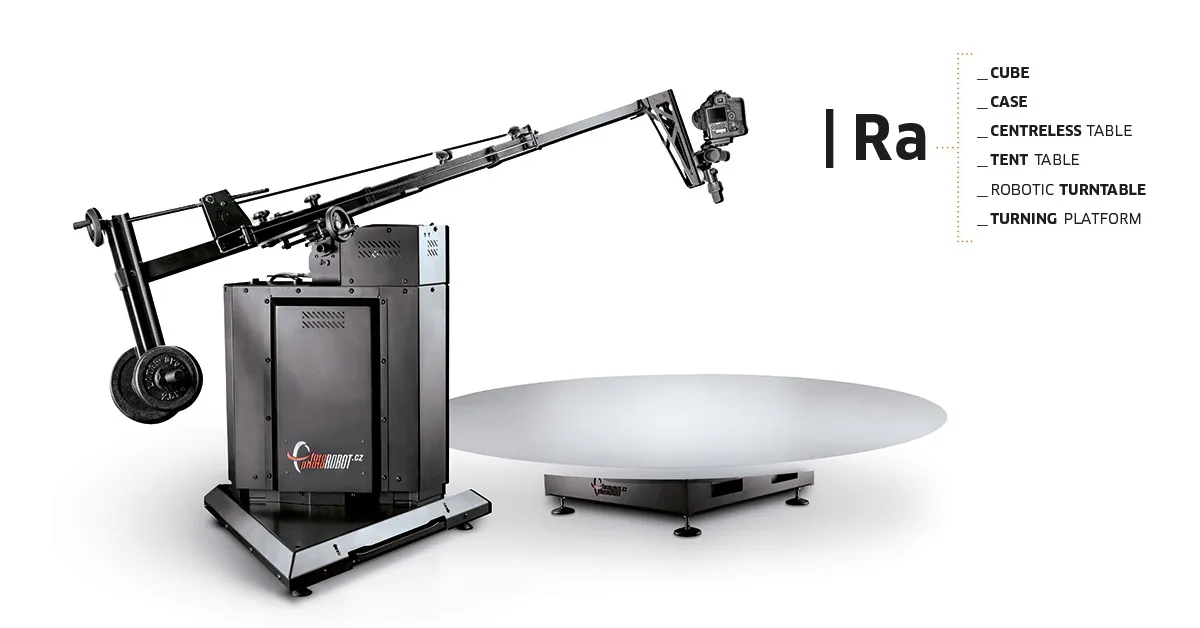
PhotoRobot'un Robotik Turntable'ı ve Robotic Arm V8 genişlemesi, ağır nesnelerin 360 ürün fotoğrafçılığı için evrensel motorlu bir turntable olarak işlev görür. Döner tabla, aletler, motorlar, otomotiv parçaları, freze makineleri ve diğer ağır eşyalar gibi 200 kilograma kadar ağırlığında küçük ama ağır nesneleri destekler. Robotic Arm V8 ile birleştiğinde, iş istasyonu 360 derece dönme ve çok satırlı 3D fotoğrafçılığı basitleştirir ve hızlandırır. Robot kolu, görüntü yakalamayı ve monte edilmiş kameranın hareketini pikaptaki ürünün döndürülmesiyle senkronize eder. Bu, öğelerin etrafında 360 derece hızla çoklu satırların hızlı bir şekilde yakalamasını sağlar; alt ve üst görünümler dahil, böylece akıcı 3D görüntü yakalama sağlanır.
Robotik Pikap ve Robotik Kolun birleşiminde temel özellikler şunlardır:
- Aşınma direncine ve 200 kilogram yüksek yük taşıma kapasitesine sahip ağır hizmet tipi döner tabla.
- Sıfır açıda fotoğraflar için masanın kenarından çıkıntılı döner tabak var.
- Lazerle yönlendirilen nesne konumlandırması, her zaman mutlak dönme merkezini bulmak için.
- Aydınlatma ve kablolama için entegre montajlar, döner tabla çerçevesinin içinden geçiyordu.
- Uzaktan kamera yakalama, otomatik döner platformla senkronize durumda.
- Kamera kolunun titremesi olmadan hassas bir yörünge boyunca akıcı kamera hareketi.
- Robotik Kol'un kolay taşınması ve kurulumu için kenetlenme istasyonu.
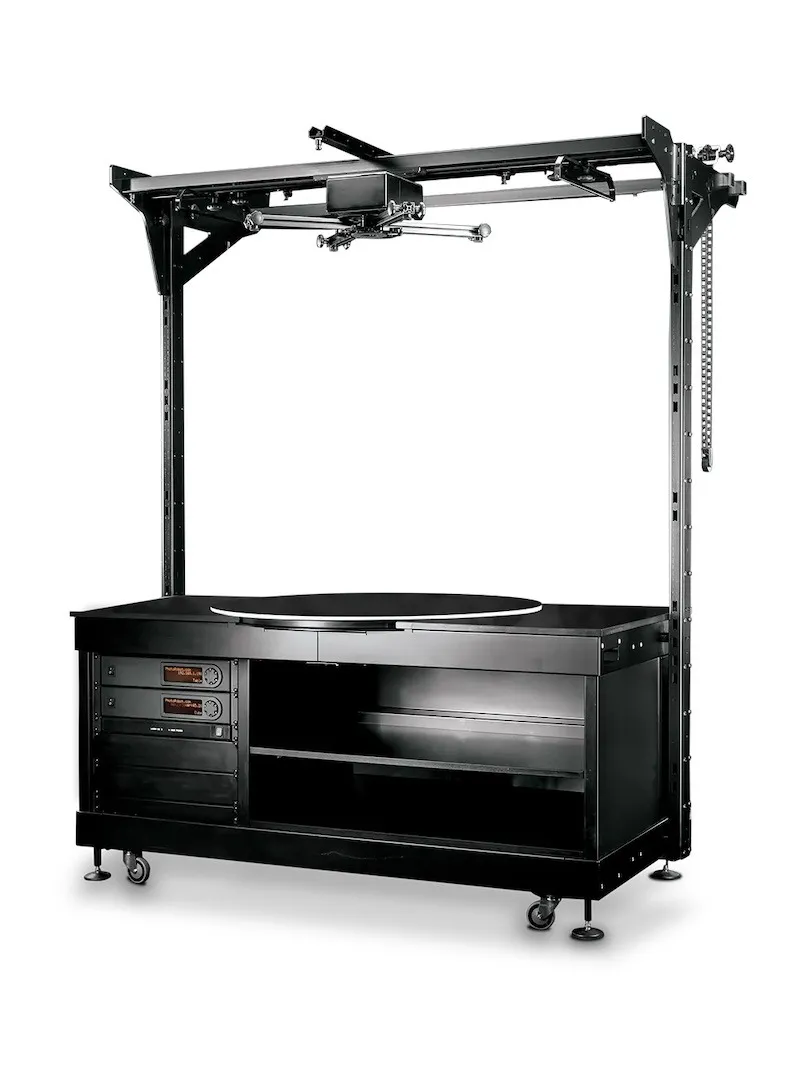
1.1. Stüdyo Entegrasyonu - Robotik Pikap ve Arm V8
Stüdyo içinde, Robotik Pikap küçük ama ağır nesnelerin fotoğrafını desteklerken, Robotik Kol V8 geniş bir montaj menziline sahiptir. Bu, iş istasyonu kullanılırken tripod başlıkları ve kameraların seçiminde çok yönlülük sağlar. Bu arada, Robotik Kol sağlam yapıya, hassas harekete ve farklı boyutlarda nesneleri yakalamak için iki kamera kolu boyutuna sahiptir. Robotik kamera kolunu uzaktan ve pikap ile stüdyo ışıklarıyla senkronize ederek tamamen otomatikleştirerek görüntü yakalamayı otomatikleştirip son derece gerçekçi 3D fotoğraflar üretmek mümkündür.

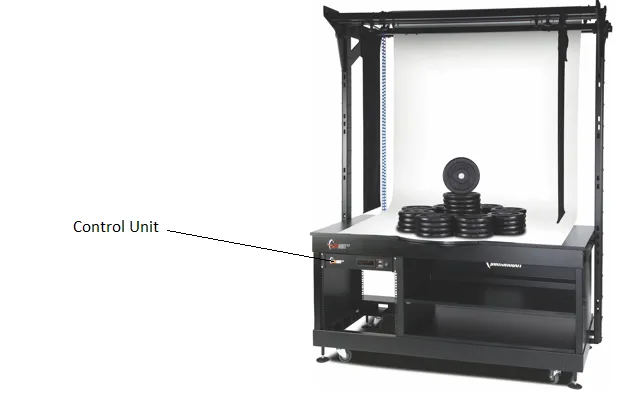
1.2. Kontrol Ünitesi - Robotik Pikap ve Kol V8
Robotik Kol V8 genişlemeli Robotik Pikapın ana bileşenlerinden biri Kontrol Ünitesidir. Kontrol Ünitesi , hem Robotik Pikap hem de Arm V8'in tüm hareketlerini çalıştırıp kontrol ettiği için sistemin ayrılmaz bir parçasıdır.
Kontrol Birimi, Robotik Kol'un fiziksel bir parçası değildir. Bunun yerine, her iki cihaz birlikte teslim edilirse Kontrol Ünitesi fiziksel olarak Robotik Pikap içine monte edilir. Kontrol Ünitesi, Robotik Pikap makinesi gövdesinin ön sol üst köşesindeki özel HD rafına yerleştirilir. Bu arada, Robotik Kol V8 kullanılırken Robotik Kol'un yanına yanaşıyor.
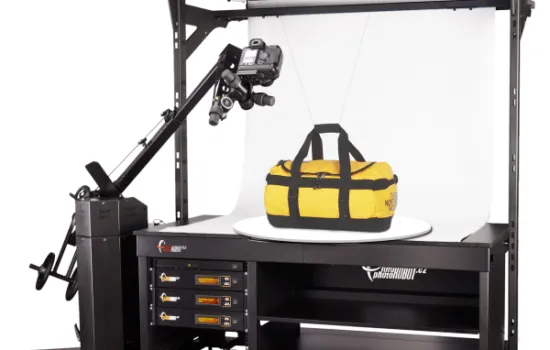
1.3. Robotik Kol V8 Genişletme Genel Bakış
PhotoRobot Robotic Arm V8, otomatik 360 fotoğrafçılık için çoğu PhotoRobot döner pikap ve cihazla uyumludur. Merkezsiz Masa, Küp, Dönme Platformu, C-Sınıfı pikaplar ve daha fazlası gibi PhotoRobot robotlarıyla birlikte çalışır.
Robotik Kol V8'in temel bileşenleri şunları içerir:
- Kontrol Ünitesi (Kol ve uyumlu pikap kontrolü için ayrı bir cihaz)
- Kamera montaj kolu (biri kısa, biri uzun ya da her ikisi)
- Hareket kabiliyeti için makine tabanında geri çekilebilir tekerlekler.
- Uyumlu turntable ve cihazlarla hızlı kurulum için docking istasyonu.
Ayrıca, kamera kolu salınmaz, böylece kamera her zaman hassas bir yörünge boyunca hareket eder. Ayrıca, tripod başlıkları ve kameraların seçiminde esneklik için geniş bir montaj aralığı ve zahmetsiz taşıma ve kurulum özellikleri de mevcuttur.
Not: Cihazın montajı, kullanımı ve ilk kullanımıyla ilgili teknik talimatlar için Robotik Kol V8 Kullanıcı Kılavuzu'na bakınız.
2. PhotoRobot'un İlk Kullanımından Önce
PhotoRobot'u ilk kez kullanıyorsanız, önce PhotoRobot çözümünü teknik açıdan anlamak gereklidir. PhotoRobot, donanım ve yazılım bileşenlerinden oluşan modüler bir birimdir. Bu, PhotoRobot'u çalıştıracak bir bilgisayarın ve PhotoRobot'un kendisinin onu çalıştıran bilgisayarla aynı ağ üzerinden bağlanmasını gerektirir. Daha sonra, ağ bulut üzerinden çalışan PhotoRobot hizmetlerine erişebilmek için internete bağlantılı olmalıdır.
Not: Ağ bağlantısı için teknik işletim gereksinimlerine uyumu sağlamak amacıyla robotik iş istasyonunun ilk kullanımından önce PhotoRobot İlk Kullanım ve Temel Testler bölümine bakınız.
Genel olarak, aşağıdaki temel işletim gereksinimleri mevcuttur.
- Kontrol Ünitesi yerel ağa bağlanmalıdır.
- Servis GUI'sini veya operatörün _Controls adlı yazılımını çalıştırmak için bir bilgisayar gereklidir.
- Bilgisayar, Kontrol Ünitesi ile aynı ağ üzerinden bağlanmalıdır.
- Ağda işlevsel bir internet bağlantısı olmalıdır.

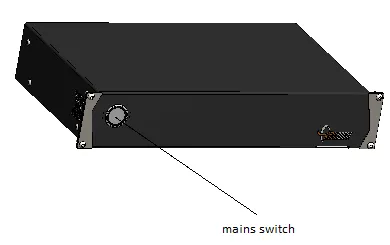
PhotoRobot'u ağa bağladıktan sonra, elektrik dağıtım sistemi parametrelerini (örneğin voltaj ve frekans) kontrol edin. Bunu yapmak için, Kontrol Ünitesinin arkasındaki RJ45 konnektörünü kullanın.
Önemli: Eğer Kontrol Ünitesi kurulumu uyumlu değilse, önce onu kurun. Bunu yapmak için, Kontrol Ünitesinin arkasındaki manuel voltaj seçicisini bulun ve Kontrol Ünitesi'ni RJ45 konnektörü kullanarak ethernet kablosu aracılığıyla ağa bağlayın.

Sonra, Arm V8 ile Robotik Pikapın çalışması için aşağıdaki ağ yapılandırma gereksinimlerinin sağlandığından emin olun.
- Ağda bir DHCP sunucusu zorunludur.
- TCP bağlantı noktaları 7777, 7778 iletişimine izin verilmelidir.
- 6666 numaralı bağlantı noktasında UDP yayınlarına izin verilmelidir.
- İnternet bağlantısı zorunludur.
- *. photorobot.com erişimine izin verilmelidir.
- as-unirobot.azurewebsites.net erişimine izin verilmelidir.
- PhotoRobot LAN'a kablolu bağlantı önerilir.
- Kurulumu PhotoRobot Ağ Koşullarına başvurarak onaylayın.
- Elektrik fişini elektrik prizine bağlayın.
Son olarak, Kontrol Ünitesi'ndeki ana düğmeye basın. Durum değiştiğinde, ışık yanıp sönen ışıktan sabit bir ışığa geçer ve bu da Kontrol Ünitesinin çalışmaya hazır olduğunu gösterir.
2.1. PhotoRobot'un IP adresini LAN üzerinden bulun
Ağın doğru yapılandırılmasından sonra, LAN üzerinde PhotoRobot'un IP adresini aramak ve tanımlamak gereklidir. Bunu yapmak için, PhotoRobot Locator uygulaması, ağdaki Kontrol Ünitelerinin daha kolay aranması ve tanımlanması için doğrudan CAPP içine entegre edilmiştir. Bu özelliğe erişmek için CAPP'nin en güncel sürümünü kullandığınızdan emin olun.
Ardından, CAPP içinde doğrudan ağdaki bir robotu tanımlamak için CAPP'nin yerel sürümünü açın, Ayarlar'a gidin ve Robotlar / Kontrol üniteleri'ne tıklayın.
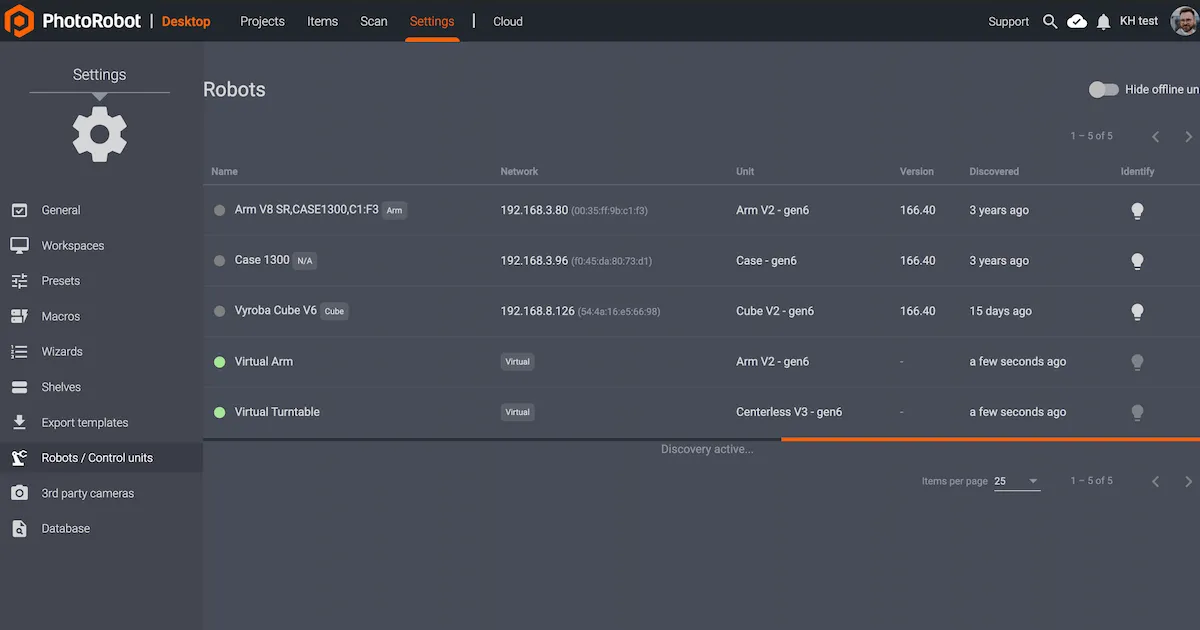
Robotlar / Kontrol üniteleri menüsü, her robot için Ad, Ağ, Ünite, Sürüm, Keşfedildi ve Tanımla sütunlarını görüntüler. Robot adının solundaki nokta yeşilse, robot çevrimiçidir. Robot alanına tıklamak, robotun web sitesi arayüzünü açacaktır. Bu aynı zamanda robotun Kontrol Ünitesi üzerindeki LED ışığının daha kolay tanımlanması için yeşil renkte yanıp sönmesini sağlayacaktır.
Uygulamanın harici olarak indirilmesi müşteri tarafından istenirse, PhotoRobot Locator, PhotoRobot Hesap İndirmeleri içinde iOS indirmesi için de mevcuttur.
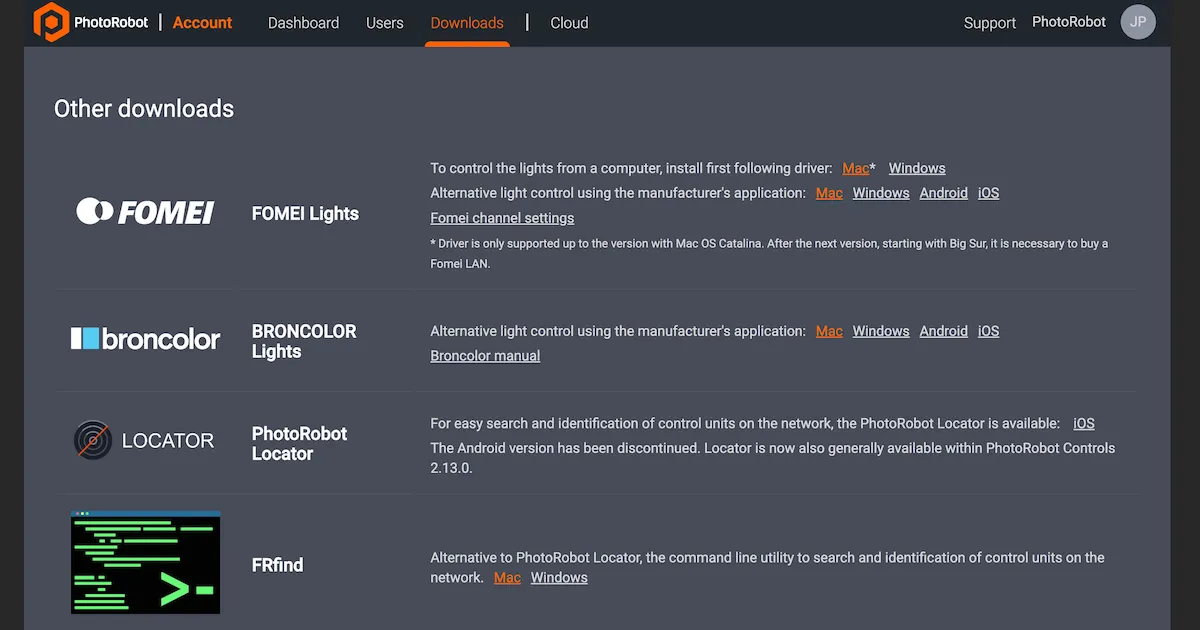
Not: PhotoRobot Locator'ın Android sürümü kullanımdan kaldırılmıştır.
Alternatif olarak, ağı aramak ve PhotoRobot Kontrol Ünitelerini tanımlamak için MacOS veya Windows için FRFind komut satırı yardımcı programı bulunmaktadır. FRFind'i indirme bağlantılarını PhotoRobot Hesap İndirmeleri sayfasında da bulabilirsiniz.
Sonra, bir PhotoRobot cihazını bulduktan sonra IP adresini kopyalayın ve adresi URL formatında herhangi bir web tarayıcısına yapıştırın. Başarılı olursa, PhotoRobot'u test etmek için temel bir kullanıcı arayüzü gösteren Servis GUI'si başlatılır.
2.2. Robotik Turntable ve Kol V8'in Temel Testleri
Servis arayüzü açıkken, basit kullanıcı arayüzü kontrollerini kullanarak makinelerin motorlarını çalıştırın. Sonra, duraklama tuşunun yanındaki sol veya sağ okları kullanarak platformu herhangi bir açıya çevirin ve ardından Robotik Kol'un hareketini test edin. Cihazlar istenen açıya hareket ederse, iş istasyonu düzenli çalışmaya hazır olur.
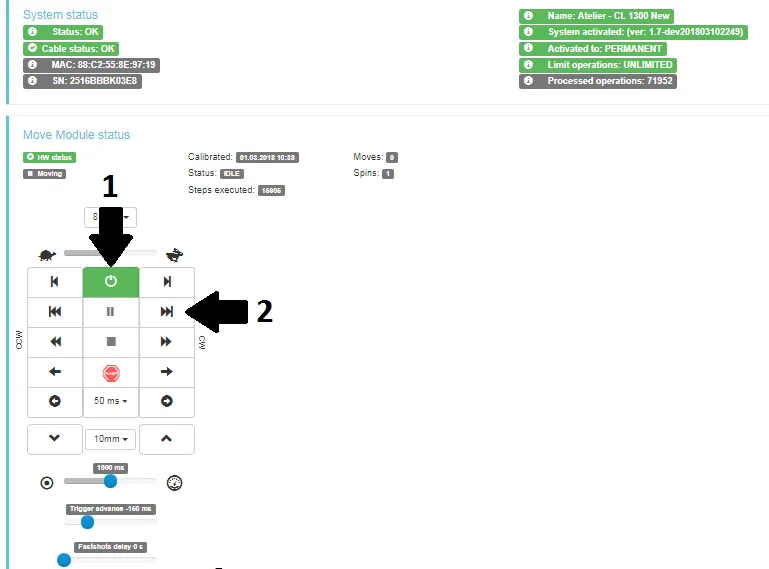
- Motorları çalıştırın (ok 1), döndürmeye çalışın (ok 2).
- Robot hareket talimatlarını takip ederse, PhotoRobot cihazınız normal kullanıma hazır olur.
3. PhotoRobot _Controls Yazılım Genel Bakış
Tüm robotlar, kameralar ve ışıklar dahil olmak üzere Robotic Arm V8 genişletme iş istasyonuna sahip Robotik Pikap üzerinden, tüm robotlar, kameralar ve ışıklar dahil olmak üzere, yazılım PhotoRobot _Controls üzerinden uzaktan kumanda. Yazılım, iş akışını yönetir ve post-processing zamanı etkili otomasyon için tüm gerekli işlevleri sağlar.
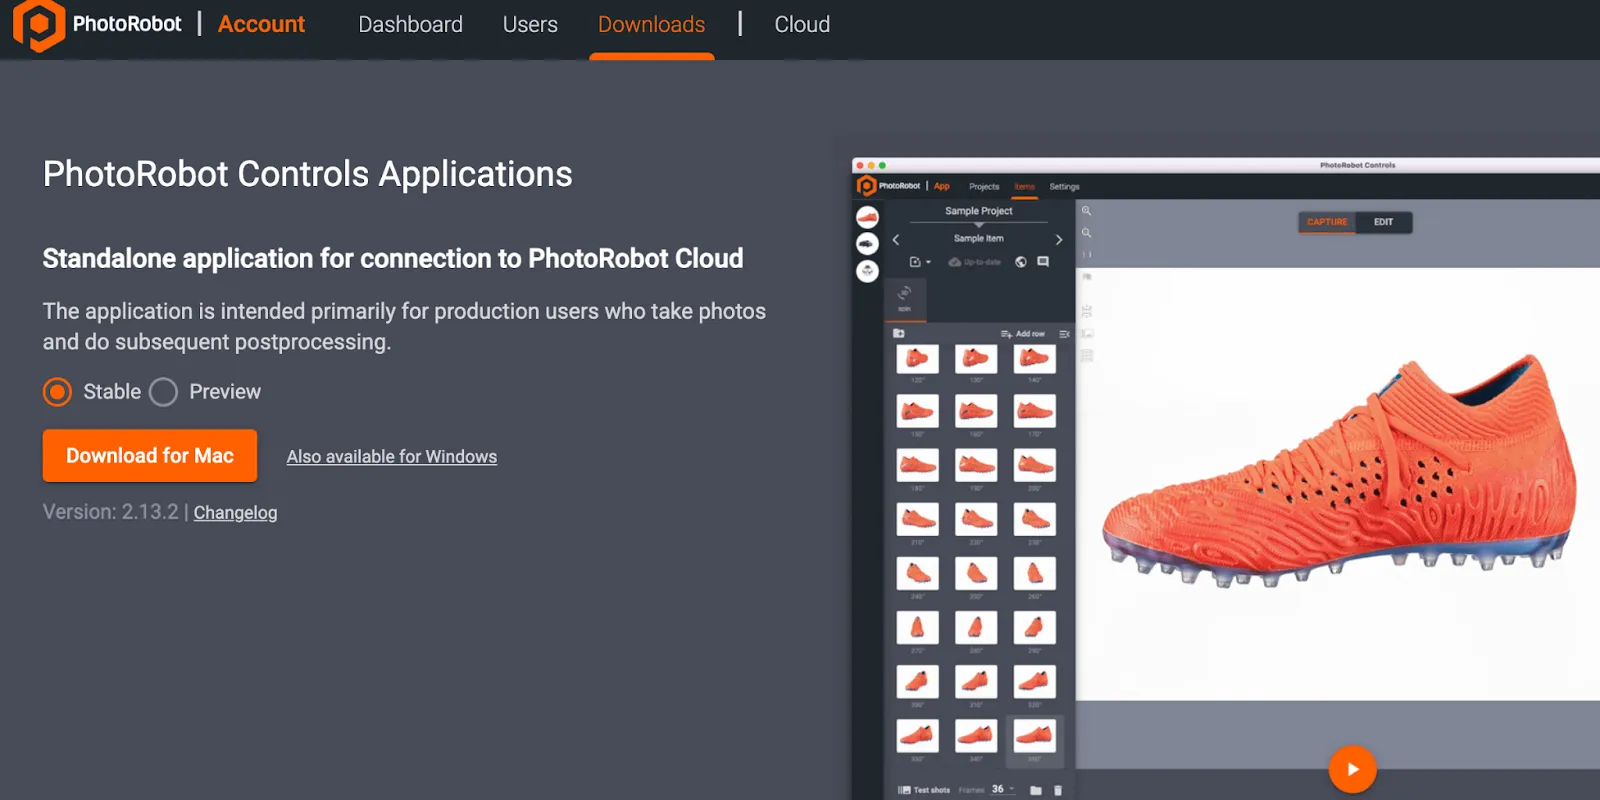
Önemli: PhotoRobot _Controls makine teslimatına dahil değildir; ayrı olarak satın alınır ve PhotoRobot hesabınız üzerinden erişilebilir hale gelir.
PhotoRobot Controls Uygulama Yazılımı'nın kurulumu ve kullanımı hakkında ayrıntılı talimatlar ve destek için PhotoRobot Başlanma Kullanım Kılavuzu'na bakınız.
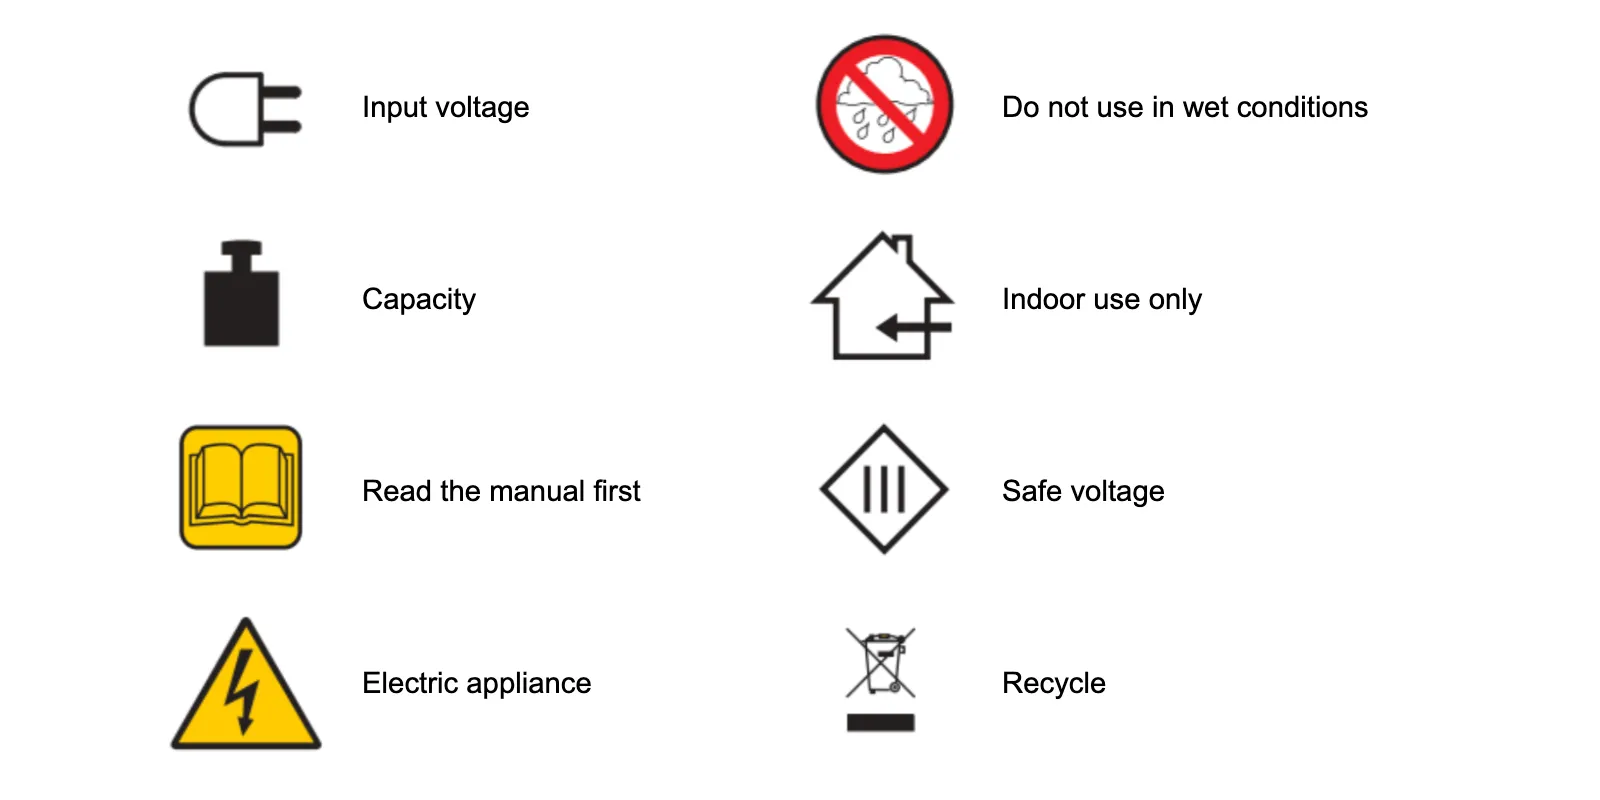
4. Bilgi Etiketleri
4.1. Semboller Genel Bakış
4.2. Makine ve Bileşen Etiketleri
Belirli makineler ve bileşenler için bilgi etiketleri için, PhotoRobot Safety Information and Instructions (3.1.) bölümünden Information Labels (3.1.) bölümüne bakınız.


EOS Asi Serisi


EOS DSLR Serisi


EOS M Aynasız Fotoğraf Makinesi Serisi


PowerShot Serisi


Yakın çekim / Elde Taşınabilir

Canon EOS Rebel Serisi, sağlam görüntü kalitesine, sezgisel kontrollere ve çok yönlü özelliklere sahip yeni başlayanlar için uygun DSLR fotoğraf makineleri sunar. Fotoğraf meraklıları için ideal olan bu kameralar, güvenilir otomatik odaklama, değişken açılı dokunmatik ekranlar ve Full HD veya 4K video kaydı sağlar.
Bağlantı
Çözünürlük (MP)
Çözünürlük
Canon EOS DSLR Serisi, yüksek kaliteli görüntüler, hızlı otomatik odaklama ve çok yönlülük sunarak hem fotoğraf hem de video prodüksiyonu için idealdir.
Bağlantı
Çözünürlük (MP)
Çözünürlük
Canon EOS M Aynasız Yazıcı, kompakt tasarımı DSLR benzeri performansla bir araya getiriyor. Değiştirilebilir lensler, hızlı otomatik odaklama ve yüksek kaliteli görüntü sensörlerine sahip bu kameralar, görüntü kalitesinden ödün vermeden taşınabilirlik arayan gezginler ve içerik oluşturucular için harikadır.
Bağlantı
Çözünürlük (MP)
Çözünürlük
Canon PowerShot Serisi, sıradan çekim tutkunları ve fotoğraf tutkunları için kompakt, kullanıcı dostu fotoğraf makineleri sunar. Basit bas-çek kameralardan gelişmiş zoom kameralara kadar değişen modellerle kolaylık, sağlam görüntü kalitesi ve görüntü sabitleme ve 4K video gibi özellikler sunarlar.
Bağlantı
Çözünürlük (MP)
Çözünürlük
Canon Yakın Çekim ve El Kameraları ayrıntılı, yakın çekim fotoğraf ve video için tasarlanmıştır. Kompakt ve kullanımı kolay olan bu kameralar, hassas odaklama, yüksek çözünürlüklü görüntüleme ve çok yönlü makro özellikleri sunarak vlog çekimi, ürün fotoğrafçılığı ve yaratıcı yakın çekimler için mükemmeldir.
Bağlantı
Çözünürlük (MP)
Çözünürlük


