
Broncolor Siros 800 S WiFi / RFS 2 Çalışma Talimatları
Broncolor Siros 800 S için aşağıdaki çalışma talimatları, üreticinin resmi malzemelerinin PhotoRobot müşteriler tarafından hızlı başvuru için kopyasıdır. Bu malzemeler, Broncolor Siros 800 S cihazlarının ilk anlaşılmasını ve bağımsız kullanımını desteklemeyi amaçlar. Ancak, Broncolor ışıklarının doğrudan PhotoRobot _Controls Uygulamasında yönetildiğini unutmayın. Bu, müşteri tarafında Broncolor donanım yönetimi sürücülerinin kurulmasına gerek kalmamasını sağlar.
PhotoRobot ile Broncolor ışıkları için donanım bileşenleri, yazılım araçları, temel modlar ve önerilen ayarlar hakkında teknik bilgi için PhotoRobot – Broncolor Lights Management sayfasına bakınız.
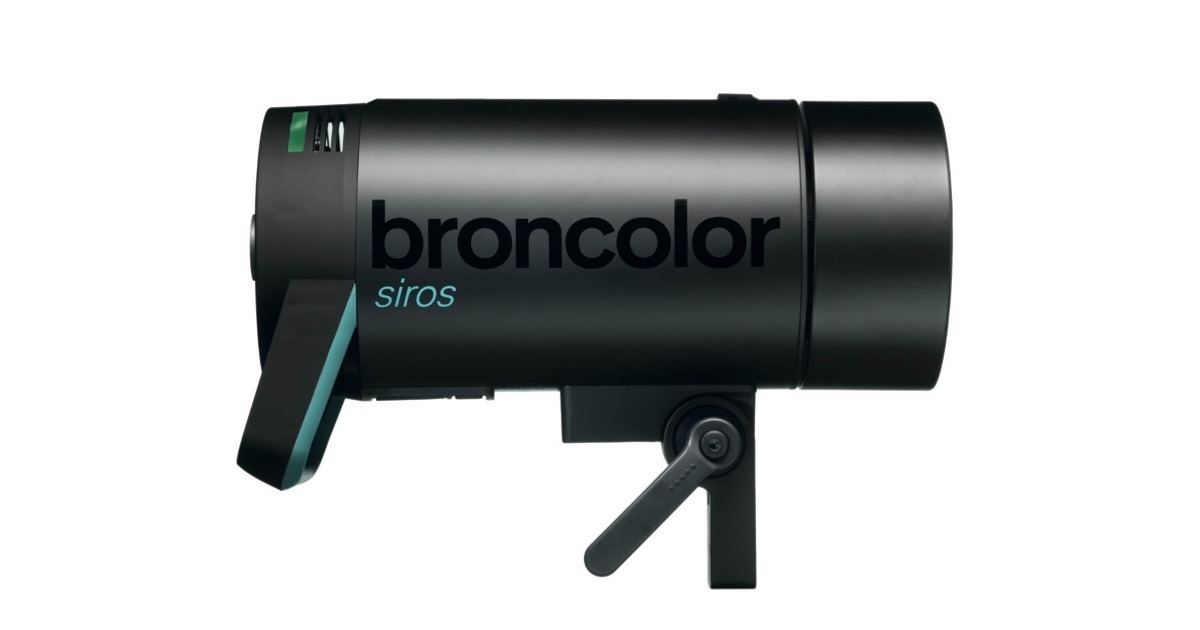
Not: Bu çalışma talimatları, üreticinin Broncolor Siros 8 S serisi stüdyo ışıkları için resmi çalışma talimatlarının bir kopyasıdır. Üreticinin web sitesi broncolor.swiss'e bakınız, özel ürününüzle ilgili orijinal dokümantasyon. Aynı zamanda, cihazınızın ilk kullanımından önce özel olarak verilen talimatları takip ettiğinizden emin olun.
Kontroller ve Ekranlar
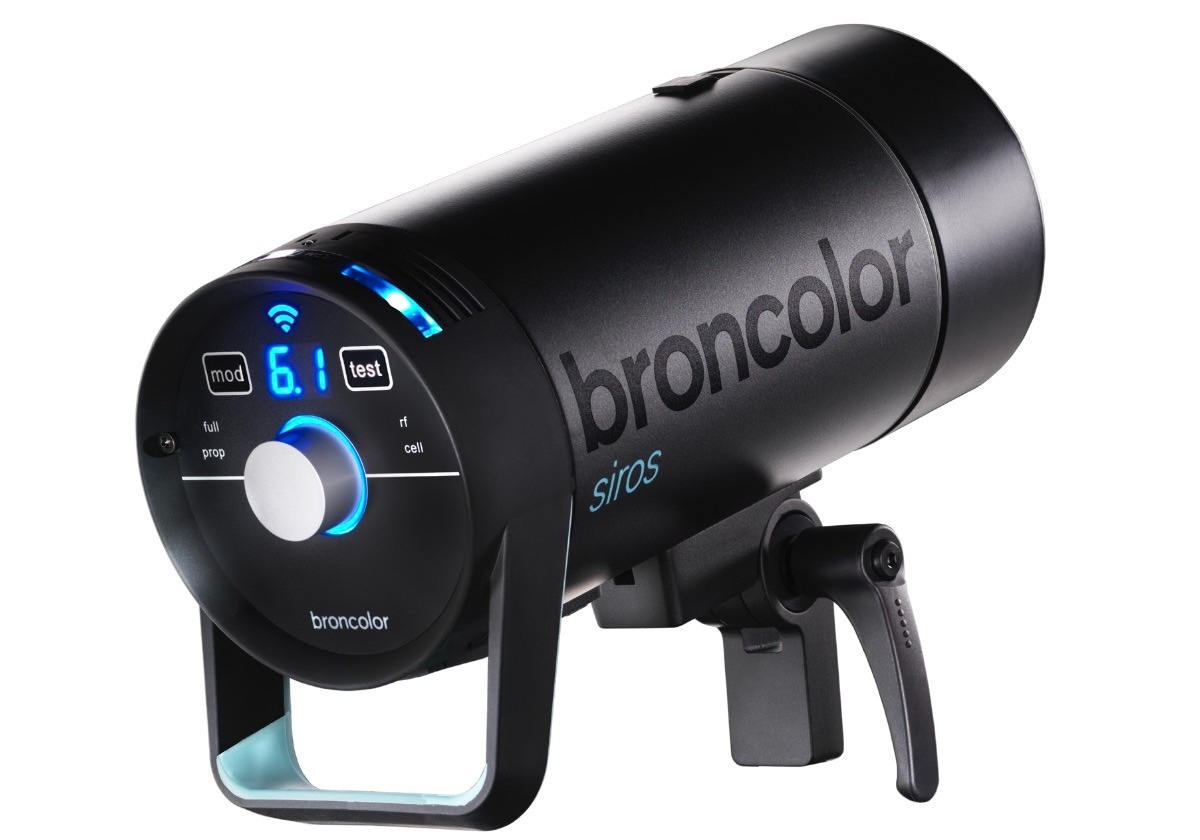
Broncolor Siros 800 S'in kontrolleri ve ekranları aşağıdaki gibidir.
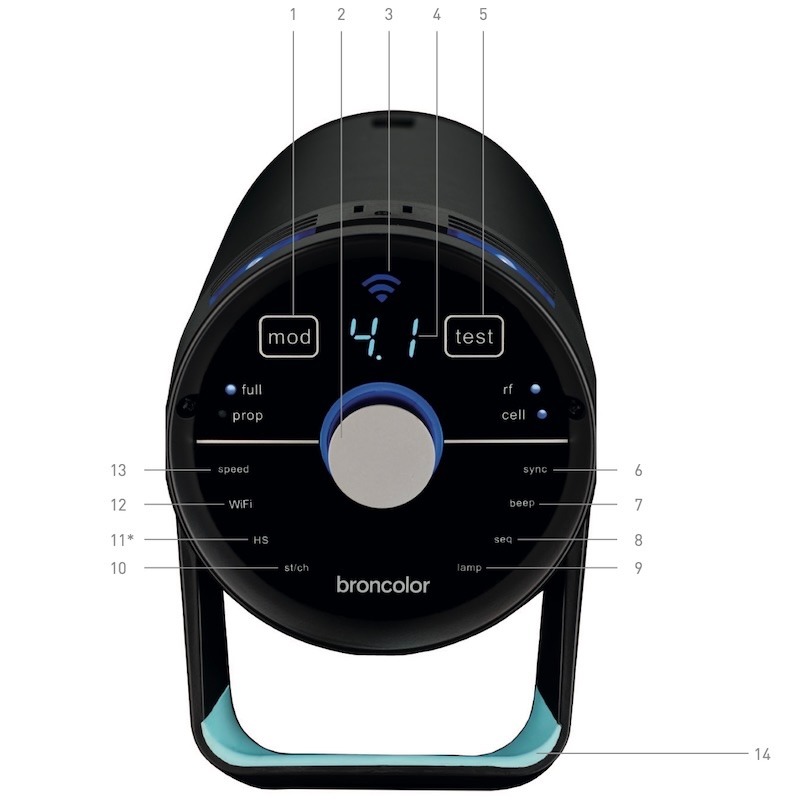
- Işık Modellemesi Açık/Kapalı
- Döner Kontrolör
- WiFi Ekran
- Dijital Güç Dağıtım Ekranı
- "test" tuşu
- Menü Ayarları
- Menü Ayarları
- Menü Ayarları
- Menü Ayarları
- Menü Ayarları
- Menü Ayarları
- Menü Ayarları
- Menü Ayarları
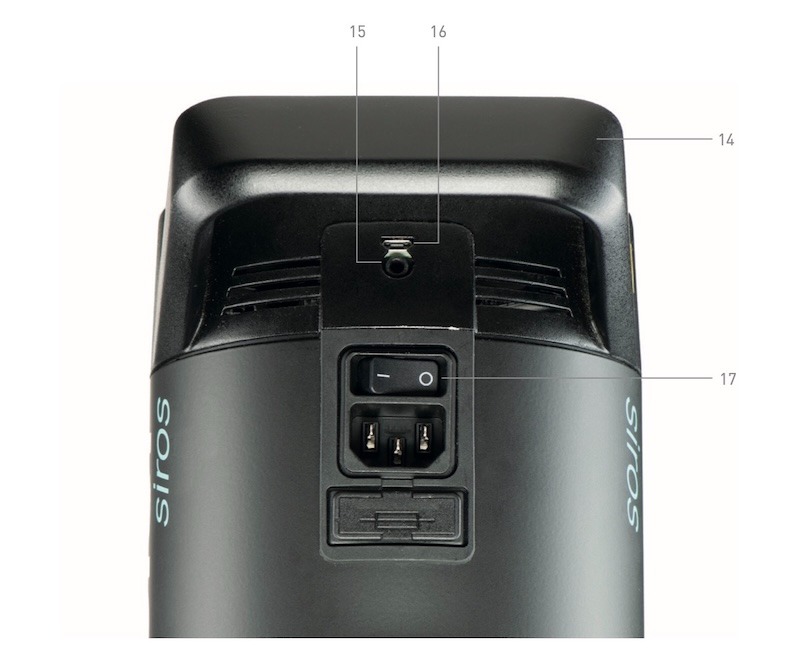
- Kulp
- Senkron Soket
- Mini USB
- Ana Anahtar
Kullanımdan Önce
Broncolor Siros S, doğru kullanılırsa yıllarca hizmet veren yüksek kaliteli bir üründür. Bu kullanım talimatlarındaki tüm bilgileri dikkatlice okuyduğunuzdan emin olun; bu talimatlar ayrıca cihazın kullanımı ve bakımı için önemli talimatları da içerir. Yeni kullanıcıları cihaz, kullanımı ve bakımı ile tanıştırmak için bu talimatlara yönlendirin. Ayrıca, cihazınız için Broncolor'dan ayrı olarak verilen güvenlik talimatlarına her zaman uyun.
Içerikler Tablosu
- Tedarik Kapsamı
- İlk Girişim
- Kontrol Unsurları
- Ana menü fonksiyonlarına genel bakış
- Menü Navigasyonu
- Flaş Zamanlarının Kontrolü
- Yayın
- HS Fonksiyonu
- Özel Görevler
- Bilgi ve Arıza Mesajları
- SSS
- Aksesuar -lar
- Bakım / Onarımlar
- Çevre Koruma Bilgileri
- Birleşik Krallık müşterileri için Garanti ve Bildirim
- Teknik Veriler
1. Tedarik Kapsamı
1.1. Siros 800 S WiFi / RFS 2 – 31.643.XX
Öncelikle, teslimatta aşağıdaki ürünleri aldığınızdan emin olun.
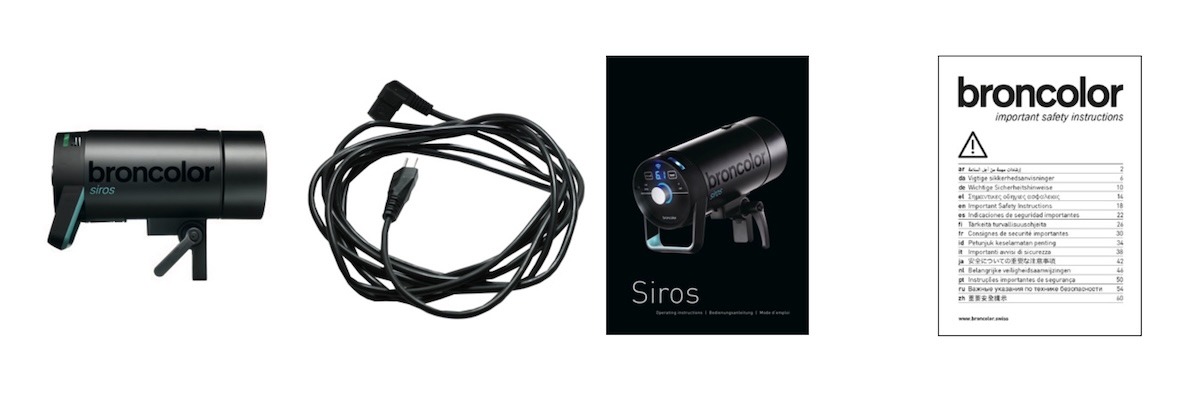
- Siros S Monolight
- Ana Kablo
- Çalışma Talimatları (BA109.00)
- Önemli Güvenlik Talimatları (WA-18-1)
1.2. Kitler
Siros Uzman Kiti içeriği şunları içerir:
- 2× Siros 800 S WiFi / RFS 2
- 1× Şemsiye, 85 cm (33.574.00)
- 1× Softbox 60 x 60 (33.561.00)
- 1× Hız Halkası (33.401.00)
- 2× Gençler Tribünü AC (35.100.00)
- 1× Flash Çanta 2 (36.532.00)
- 1× Aksesuar Çantası (36.535.00)
- 1× Senkronizasyon Kablosu (34.111.00)
Siros Pro Kit içeriği şunları içerir:
- 3× Siros 800 S WiFi / RFS 2
- 1× Softbox 60 x 60 (33.561.00)
- 1× Octabox 75 (33.600.00)
- 2× Hız Halkası (33.401.00)
- 2× L40 Standart Reflektör (33.115.00)
- 3× Gençler Tribünü AC (35.100.00)
- 1× Flash Çanta 3 (36.533.00)
- 1× Aksesuar Çantası (36.535.00)
- 1× Senkronizasyon Kablosu (34.111.00)
2. İlk Girişim
2.1. Koruyucu Örtüyü Kaldırın
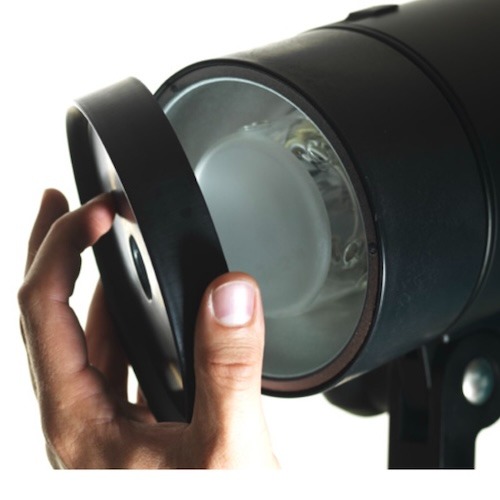
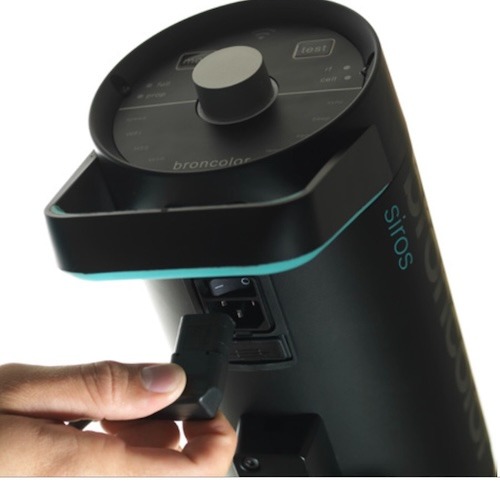
2.2. Ana Kablosunu Takla
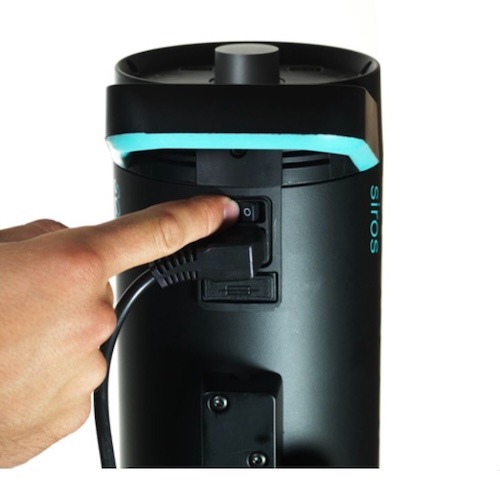
2.3. Ana anahtarda üniteyi aç
3. Kontrol Unsurları
3.1. Eleman Fonksiyonları
Döner Kontrolör (2)

- Döner kontrolcü (2) üniteyi açıp kapatmak için işlev görür (bekleme modu). Döner kontrolcüye 3 saniye basılırsa, ünite bekleme rejimine geçer.
- Menüde, döner kontrolcü menü gezintisini ve menü öğelerinin onayını etkinleştirir. Menü navigasyonu hakkında daha fazla açıklama 5. bölümde bulunmaktadır.
- Çalışırken, döner kontrolcü flaş enerjisini değiştirir. Saat yönünün tersine döndürmek flaş enerjisini azaltırken, saat yönünde döndürülür. Bu arada, kontrolciyi yavaşça döndürmek 1/10 f-stop adımlarda değiştirir ve hızlı dönerken ("burma") 1/1 f-stop adımlarla değişir.
Bilgi Ekranı (4)
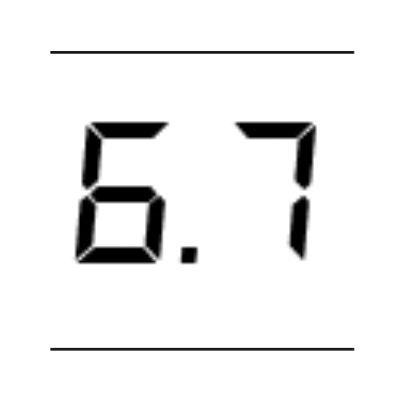
- Bilgi ekranı (4) seçilen flaş enerjisini veya menü seçimi seçeneklerini gösterir.
Mod - Modelleme Işığı AÇIK / KAPALı (1)
- "mod" (1) numarasını kullanarak modelleme ışığını açıp kapatın. Düğmeye daha uzun basmak çalışma modunu "full"dan "prop"a veya tam tersine değiştirir.
Test (5)
- "test" (5) kelimesini kullanmak test başlatır. Döner kontrolcünün etrafındaki "Hazır" ekranı, şarj / deşarj işlemi tamamlanır tamamlanmaz maviye dönüyor.
3.2. Menyu Fonksiyonları
Speed (13)
- "Hız" (13) menü ayarı hızlı şarj ve flaş süreleri içindir. Daha fazla açıklamayı bu çalışma talimatlarının 6. bölümünde bulabilirsiniz.
WiFi (12)
- "WiFi" (12), WiFi'nin açık mı kapalı olduğunu gösterir.
HS (11)

- "HS" HS'nin açık mı kapalı olduğunu gösterir.
Stüdyo / Kanal (10)
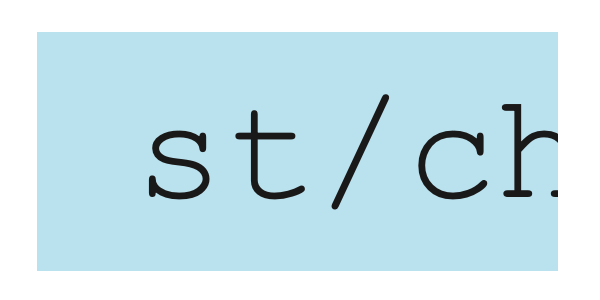
- Menü ayarı "st / ch" (10) stüdyo/kanalı değiştirmek içindir. Mevcut stüdyo kanalını (RFS 2) değiştirmek için kullanın.
Lamba (9)

- Menü ayar lambasını (9) kullanarak lamba kanalını (RFS 2) seçin.
Dizi (8)
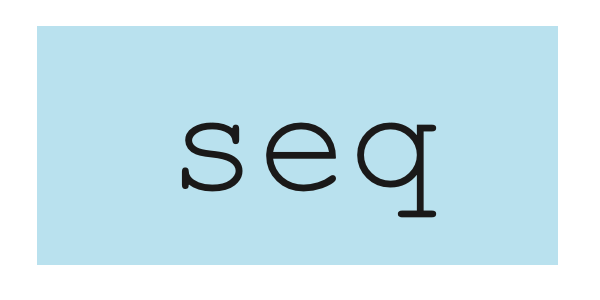
- "Seq" (8) menü ayarı, flaş sayısını seçer.
Bip (7)

- "Bip" (7) menü fonksiyonu, akustik "Ready" uyarısının açık mı kapalı olduğunu gösterir.
Senkronizasyon (6)
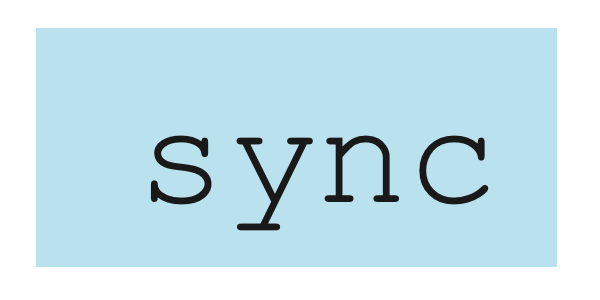
- "Senkronizasyon" (6) kullanmak, farklı serbest bırakma yöntemlerinin (fotosel, radyo, fotosel ve/veya radyo) seçilmesine olanak tanır.
Senkronize Soket / Mini USB (15 / 16)

- Senkronizasyon kablosu üzerinden yayın için Sync soketi / Mini USB (15 / 16 ) menü fonksiyonlarını veya mini USB üzerinden yazılım güncellemesini kullanın.
Açık / Kapalı (17)

- Üniteyi açıp kapatmak için ( 17) numarasını kullan .
4. Ana Fonksiyonların Genel Görünümü
Ana işlevler şunlardır.
- Ana menüye girmek için döner kontrolcüye (2) basın.
- Döner kontrolcüyünü (2) saat yönünde veya ters yöne çevirerek gerekli menü öğesine ulaşın.
- Seçiminizi doğrulamak için döner kontrolcü (2) tuşuna tekrar basın. Seçilen menü öğesi yanıp sönmeye başlar.
5. Menü Navigasyonu
Broncolor Siros 800 S'nin menü işlevleri şunlardır:
- Hız
- WiFi
- HS
- st/ch
- lamba
- Devam
- bip
- Senkronizasyon
Döner kontrolcü (2) tuşuna bastıktan sonra, monolight'ın ana menüsüne giriyorsunuz. Oradan çeşitli işlevlere erişim sağlıyorsunuz.
Lütfen dikkat: Bir menü öğesi seçilemiyorsa, örneğin Siros 800 S dışındaki ürünlerde, ünite bu işlevi desteklemez.
Örnek: Her sürüm için 15 flaş dizisini ayarlayın.
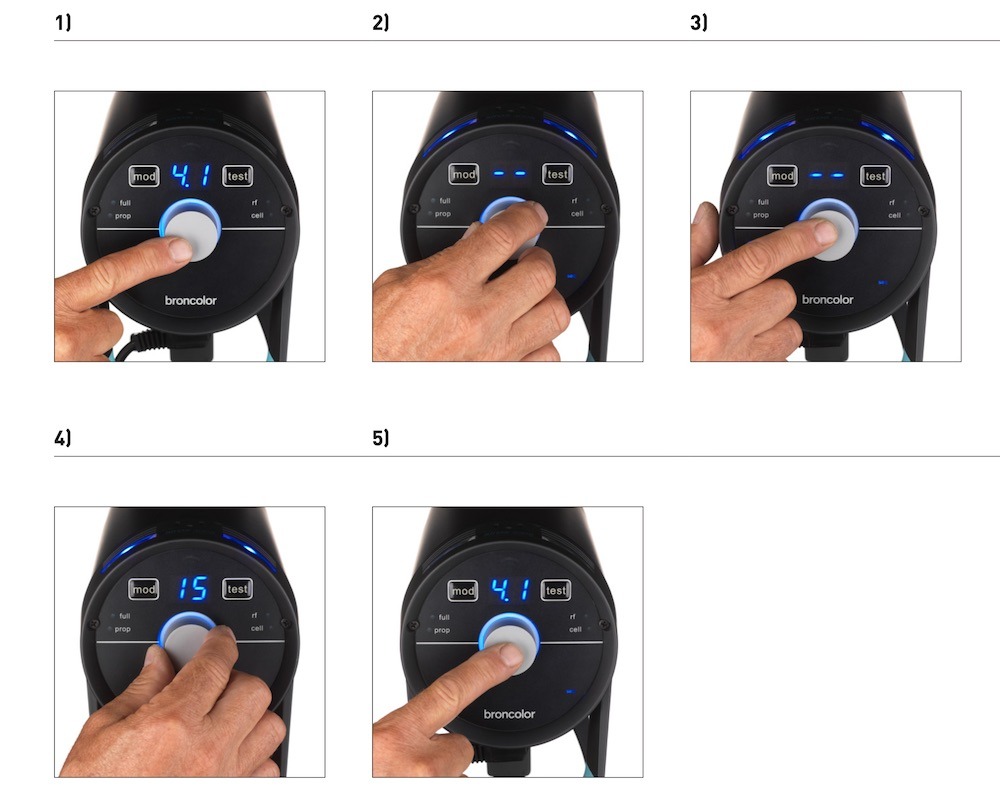
- Ana menüye girmek için döner kontrolcü (2) tuşuna basın. Son seçilen menü öğesi görüntülenecektir. Ana ekran, çıkış gücünü göstermekten seçilen menü öğesine değişir.
- Döner kumandayı (2) çevirerek menü öğesi "seq"e ulaşana kadar çevirin.
- Bu işlevi doğrulamak için döner kontrolcüye (2) basın. "Seq" ekranı yanıp sönmeye başlar.
- Döner kontrolcü (2) ana ekranda "15" görünene kadar çevirin.
- Bu seçimi döner kontrolcü (2) tuşuna basarak onaylayın. Bu onaydan sonra ünite normal duruma geçer. Seçim 5 saniye içinde onaylanmazsa, cihaz ayarını değiştirmeden normal duruma geçer.
6. Flaş Zamanlarının Kontrolü
Ana menüde monolight'ın yanış süresini "hız" olarak ayarlayabilirsiniz. Bu ayar, seçilen enerji seviyesi için mümkün olan en hızlı parıltı süresini hesaplar. Bu ayrıca flaş renginin mavi bölgeye doğru hafifçe kaymasına neden olabilir.
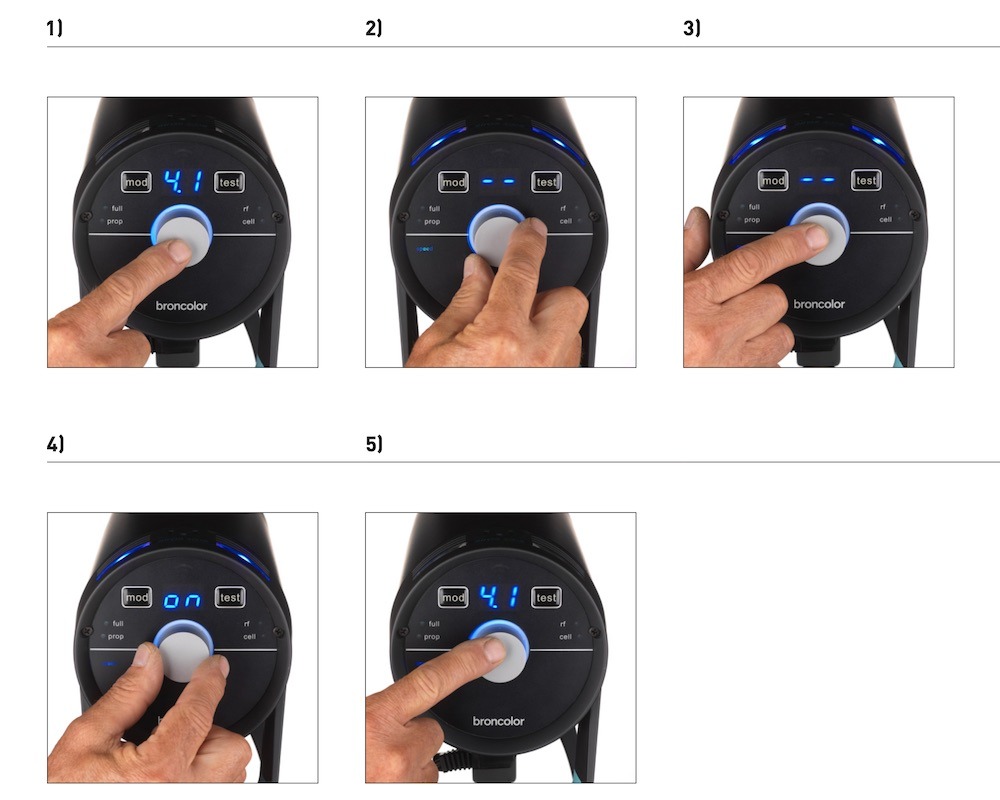
- Ana menüye girmek için döner kontrolcü (2) tuşuna basın.
- Döner kontrolciyi (2) çevirerek menü öğesi "hız"a ulaşana kadar çevirin.
- Bu seçimi döner kontrolcüye (2) basarak onaylayın.
- Döner kontrolcü (2) kullanarak "açık" veya "kapalı" seçeneğini seçin.
- Bunu döner kontrolcü ile (2) doğrulayın.
7. Serbest bırakma
7.1. RFS 2 Modülü (Radyo Frekans Sistemi)
RFS 2 flaş kontrolü için, kanal (stüdyo adresi) vericinin kanalına karşılık gelmelidir. Stüdyo adresi menüde "st" konumunda ayarlanmıştır. Lamba kanalı, menüde "lamp" altında tanımlanmıştır. Biliş ışıklarının renklerinin değiştirilmesiyle ilgili daha fazla bilgi için bölüm 9.3'e bakınız.
Radyo vericisi ile, bireysel lambaları istediğiniz gibi tanımlayıp ayarlayabilirsiniz. Bunu öğrenmek için lütfen vericinin çalışma talimatlarına bakınız. Verici standart olarak bireysel başlıklarla birlikte değildir.
7.2. Fotosel (hücre)
Fotosel, menü fonksiyonu "senkronizasyon" (6) kullanılarak açılıp kapatılabiliyor. Bu aktifken, "hücre" etiketinin yanındaki mavi LED yanır. Bir dizinin ilk flaşından sonra, aktif fotohücre devre dışı bırakılır ve "senkronize" tuşunun (6) yanındaki mavi LED yanıp söner. "Test" tuşuna basıldığında tekrar açılır.
7.3. Senkronize Soket (15)
Senkronizasyon kabloları – 5m (16.4ft) (Madde No. 34.111.00) ve 10m (32.8ft) (34.112.00) – kablo serbest bırakmak için sokete takılabilir (15).
7.4. "test" anahtarı (5)
Bu tuş kullanılarak monolight manuel olarak tetiklenebilir. Flaş, ayarlanan enerji seviyesinin %70'ine ulaşıldığında tetiklenebilir. Görsel "Hazır" göstergesi ise yalnızca %100 ulaşıldığında yanır.
8. HS Fonksiyonu
RFS 2.2 vericisi ile birlikte, son derece hızlı enstantane hızlarına sahip Siros 800 S monolight kullanabilirsiniz. Örneğin, ortam ışığı ile diyafram geniş açık (seçici odak) olsa bile, görüntü 1/8000'e kadar doğru şekilde az pozlanabilir ve Siros hâlâ baskın ve yaratıcı ışık efektlerini ayarlamanıza izin verir.
Bunun için ihtiyacınız olan tek şey Canon, Fuji, Nikon ve Sony kameralar için mevcut olan RFS 2.2 vericisidir. Ayrıca, tüm Siros ünitelerinde HS etkinleştirilmelidir. Bu, flaş eğrisini değiştirir ve RFS 2.2 ile birlikte seçtiğiniz enstantane hızında hiçbir sınır olmadan doğru pozlama garantisi sağlar.
HS fonksiyonunun optimal kullanımı hakkında daha fazla bilgi edinmek için lütfen RFS 2.2 vericisinin çalışma talimatlarını okuyun.
HS modunda çalışırken, Siros ile sadece 4 ila 10 seviye flaş gücünü kullanabiliyorsunuz.
9. Özel Fonksiyonlar
9.1. Fabrika ayarlarına sıfırlama
"Test" tuşuna (5) 4 saniye boyunca basın. Bu, tüm fonksiyonları fabrika ayarlarına geri döndürür. Sıfırlama çift bip sesiyle onaylanır.
9.2. "bronControl" Uygulaması ve WiFi Ayarları
Siros monolight cihazınızı kontrol etmek için "bronControl" uygulamasını ücretsiz olarak indirebilirsiniz. Uygulamayı bulmak için Apple'ın App Store'unda veya Google Play Store'da "bronControl" aramanızı yapın.
9.2.1. Çalışma Modları
9.2.1.1. "Özel" Modda İşlem (Fabrika Ayarı)
WiFi modu birden fazla monolight üzerinde etkinleştirildiğinde, bu üniteler otomatik olarak aynı stüdyo adresiyle bağlanarak özel bir ağ oluşturur. Bu ağın kontrol edilebilmesi için bir akıllı telefon veya tablet bağlanmalıdır. Bunu kullanmak için, akıllı telefonunuzda veya tabletinizde WiFi fonksiyonunu etkinleştirin. Cihazınız otomatik olarak mevcut WiFi ağlarını arayacaktır. Akıllı telefonunuzu veya tabletinizi uygun Bron-Studio ağına bağlayın. Bağlantı şifresi: bronControl. Şimdi cihazınızda "bronControl" uygulamasını başlatın. "Add new studio" bölümüne uygun stüdyo numarasını ekleyin ve uygulamayı bu stüdyoya bağlayın. Kullanım hakkında daha fazla talimatlar için lütfen uygulamadaki "?" yardım fonksiyonunu kullanın.
9.2.1.2. "Enterprise" Modunda Çalışma
Mevcut bir WiFi ağı (yönlendirici) varsa, cihaz bir akıllı telefon veya tablet kullanılarak bu ağa entegre edilebilir. Bunu sağlamak için, "bronControl" uygulamasında ayarlar altında "Network Settings" bölümüne gidin ve routerınızın ayarlarını "enterprise" modunda girin. Ünitelerin doğru stüdyo adresine ayarlandığından emin olun. Siros son bağlantı türünü kaydeder ve bir sonraki başlatmada son ağa bağlanmaya çalışır.
9.2.2. Menyu Ayarları
Menü ayarları şu şekilde tanımlanmıştır: açık / kapalı / senkronizasyon (açık / -- / sy).
9.2.3. Ünitede WiFi Ekranı (3)
Ünitedeki Wifi ekranı (3) için semboller ve açıklamaları aşağıdaki gibidir.
9.3. Biliş Işıkları
Çeşitli lamba kanalları (bölgeler) seçildiğinde, ünitenin üst yüzeyindeki biliş ışığı renk değiştirir. Bunun amacı, "bronControl" uygulaması tarafından kontrol edilen bireysel birimleri ayırt etmektir. Cihazın üzerindeki ışık, uygulama bir akıllı telefon veya tablette etkinleştirildiğinde veya cihazın döner kontrolcüsüne basıldığında renk değiştirir; menüden çıkınca tekrar maviye dönüyor.
Lamba kanalı renkleri aşağıdaki gibidir.
10. Bilgi ve Arıza Mesajları*
10.1. Akustik Sinyaller
Akustik sinyaller bip sesi veya çift bip sesi olur.
10.2. Mesaj Ekranda
Not: *Hata mesajları her zaman kırmızı biliş ışığı ile de belirtilir.
11. SSS
11.1. Flaş Tüplerinin Değiştirilmesi
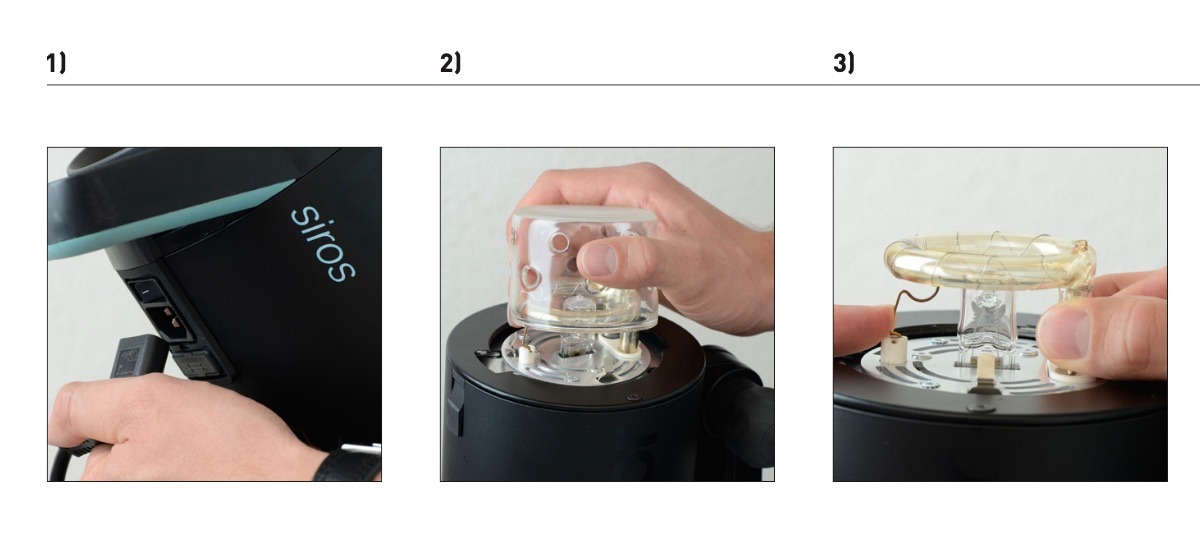
- Ana kablo ünitesinden çıkarın.
- Emniyet camını tutucu klipslerinden çıkararak çıkarın.
- Kontakt yayını aşağıya doğru bastırın ve flaş tüpünü dikkatlice çıkarın.
11.2. Sigortanın Değiştirilmesi
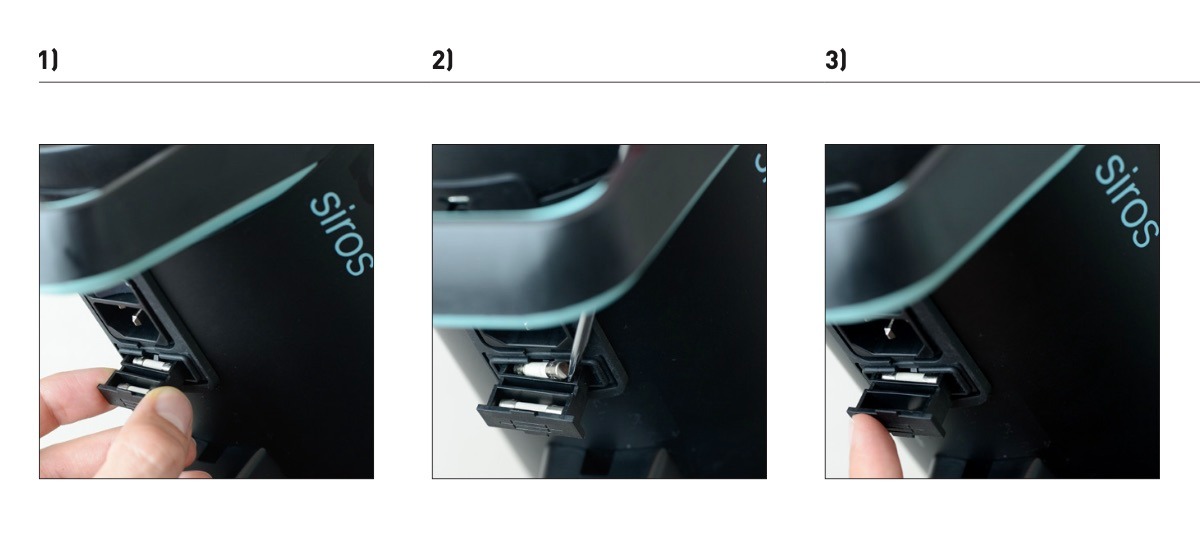
- Ana kablo ünitesinden çıkarın (yukarıdaki 1. resme bakınız). Ünitenin altındaki sigorta bölmesini açın.
- Patlayan fitili dikkatlice sivri bir nesneyle söndür.
- Yedek sigortayı takın ve sigorta bölmesini tekrar kapatın
11.3. Işık şekillendiricilerin değişmesi
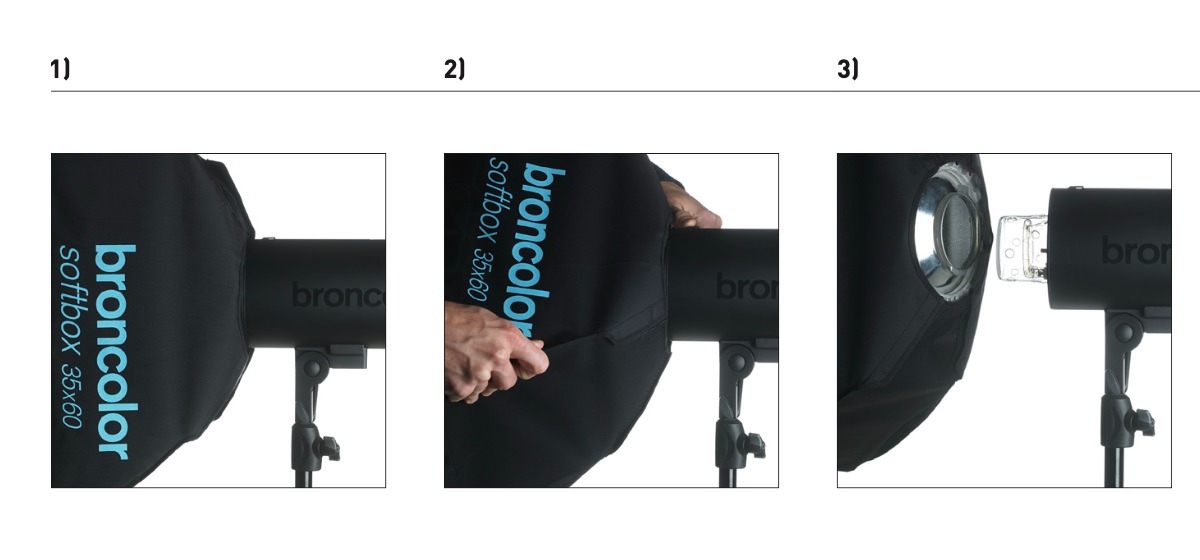
- Işık şekillendiricisini durana kadar her iki yöne çevirin.
- Serbest bırakma düğmesini geriye doğru çekin ve aynı anda ışık şekillendiricisini süngü bağlantısından kurtulana kadar çevirin.
- Işık şekillendiricisini dikkatlice öne çıkarın. Güvenlik camına zarar vermemeye dikkat edin.
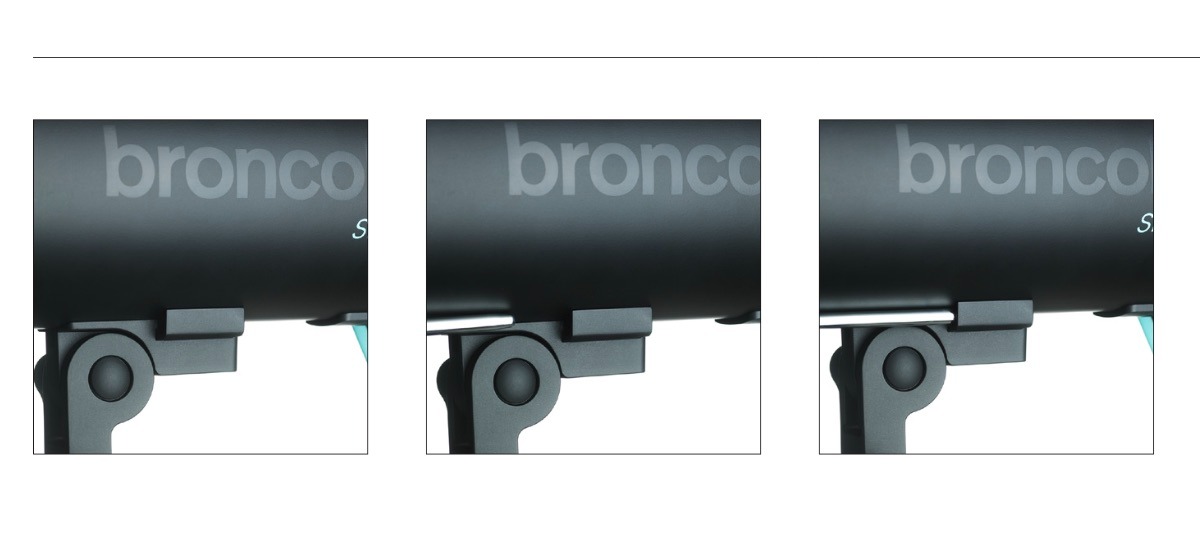
11.4. Şemsiye Takmak
Şemsiyeyi monte etmek için, ünitenin altındaki açıklığa yerleştirin.
12. Aksesuarlar
Siros, broncolor ışık şekillendiricilerin tamamıyla uyumludur.
Aşağıdaki ürünler özellikle önerilen aksesuarları temsil eder:
13. Bakım ve Onarımlar
Broncolor monolight hassas bir cihazdır ve uygun özenle tedavi edildiğinde yıllarca sorunsuz çalışma sağlayabilir. Ancak bir arıza olursa, lütfen üniteyi açıp kendiniz tamir etmeye çalışmayın. Ünite kapalı olsa bile, içinde tehlikeli voltaj seviyeleri olabilir. Bu nedenle, bakım ve onarım için üniteyi her zaman Broncolor servis noktanıza gönderin.
14. Çevre Koruma Bilgileri
Kullanım ömrünün sonunda, bu ürün normal ev atığı olarak bertaraf edilmeyebilir. Bunun yerine, elektrikli ve elektronik cihazların geri dönüşümü için bir toplama noktasına götürülmelidir. Malzemeler, işaretlerine göre geri dönüştürülebilir. Eski cihazların yeniden kullanımı, geri dönüştürülmesi veya diğer kullanım biçimleriyle çevremizin korunmasına önemli bir katkı sağlamış olursunuz.
Lütfen yerel yetkililerinize veya Broncolor satış ortağına uygun bertaraf noktasını sorun.
15. Garanti
Tüm broncolor güç paketleri, lambalar, monolight ve aksesuarlar yüksek kalite standartlarına uygun üretilmiştir. Broncolor, yukarıdaki broncolor ürünlerinde satın alma tarihinden itibaren (ilk sahibi için) iki yıllık fabrika garantisi sunar. Bu garanti kapsamında flaş tüpleri, halojen lambalar, güvenlik gözlükleri, kablolar, piller ve tekstil dahil değildir. Güvenlik talimatlarına uyulmama, yanlış kullanım, başka bir üreticinin aksesuar kullanımı, yetkisiz müdahale veya modifikasyon kaynaklı arızalar fabrika garantisinden hariçtir. Broncolor / PhotoRobot, güvenlik talimatlarının uyulmaması, yanlış kullanım, başka bir üreticiden aksesuar kullanımı veya yetkisiz müdahale veya değişiklik nedeniyle oluşan hasar için sorumluluk almamaktadır. Teknik sorun durumunda, lütfen hemen en yakın yetkili Broncolor servis istasyonuna ulaşın. Ürün numaraları, ürün açıklamaları ve tedarik kapsamı ülkeden ülkeye değişiklik gösterebilir. Daha ayrıntılı bilgi için lütfen Broncolor satış ortağınızla iletişime geçin. Hatalar ve baskı hataları hariç.
16. Birleşik Krallık Müşterileri için Bildirim
Bu cihaz, kablosuz bir LAN ağına bağlanacak şekilde yapılandırılabilir. Lütfen bu ürünü güvenli altyapıya bağlanacak şekilde yapılandırın. Normal çalışma için yapılandırma modunu kullanmayın.
- Güvenlik Açıkları Raporları: support@broncolor.swiss
- Tepki süresi: 30 gün
- Birleşik Krallık Tanımlı Destek Dönemi: Satış tarihinden 2 yıl sonra, yalnızca 29 Nisan 2024 tarihinde veya sonrasında Birleşik Krallık'ta (Kuzey İrlanda hariç) satılan ürünler için geçerlidir
- Üretici adı: Bron Elektronik AG
- Üretici adresi: Hagmattstrasse 7, 4123 Allschwil, İsviçre
17. Teknik Veriler


EOS Asi Serisi


EOS DSLR Serisi


EOS M Aynasız Fotoğraf Makinesi Serisi


PowerShot Serisi


Yakın çekim / Elde Taşınabilir

Canon EOS Rebel Serisi, sağlam görüntü kalitesine, sezgisel kontrollere ve çok yönlü özelliklere sahip yeni başlayanlar için uygun DSLR fotoğraf makineleri sunar. Fotoğraf meraklıları için ideal olan bu kameralar, güvenilir otomatik odaklama, değişken açılı dokunmatik ekranlar ve Full HD veya 4K video kaydı sağlar.
Bağlantı
Çözünürlük (MP)
Çözünürlük
Canon EOS DSLR Serisi, yüksek kaliteli görüntüler, hızlı otomatik odaklama ve çok yönlülük sunarak hem fotoğraf hem de video prodüksiyonu için idealdir.
Bağlantı
Çözünürlük (MP)
Çözünürlük
Canon EOS M Aynasız Yazıcı, kompakt tasarımı DSLR benzeri performansla bir araya getiriyor. Değiştirilebilir lensler, hızlı otomatik odaklama ve yüksek kaliteli görüntü sensörlerine sahip bu kameralar, görüntü kalitesinden ödün vermeden taşınabilirlik arayan gezginler ve içerik oluşturucular için harikadır.
Bağlantı
Çözünürlük (MP)
Çözünürlük
Canon PowerShot Serisi, sıradan çekim tutkunları ve fotoğraf tutkunları için kompakt, kullanıcı dostu fotoğraf makineleri sunar. Basit bas-çek kameralardan gelişmiş zoom kameralara kadar değişen modellerle kolaylık, sağlam görüntü kalitesi ve görüntü sabitleme ve 4K video gibi özellikler sunarlar.
Bağlantı
Çözünürlük (MP)
Çözünürlük
Canon Yakın Çekim ve El Kameraları ayrıntılı, yakın çekim fotoğraf ve video için tasarlanmıştır. Kompakt ve kullanımı kolay olan bu kameralar, hassas odaklama, yüksek çözünürlüklü görüntüleme ve çok yönlü makro özellikleri sunarak vlog çekimi, ürün fotoğrafçılığı ve yaratıcı yakın çekimler için mükemmeldir.
Bağlantı
Çözünürlük (MP)
Çözünürlük


